


Connecting to Other Databases
Contents
Overview
Connecting to databases to read data from a database, add data to a database or update existing data in a database is a very common task for programmers. On the previous pages we saw how to connect to a SQLite database from Python. Connecting to other database systems is simular, yet with some variation in the methods and code syntax.
Connecting to a database from Python (or any programming language) is conceptually similar regardless of the database system or the programming language. The difference is how one might connect and some syntactic differences in your code. The overall concept involves, generally, the following steps:
- Select a method of connection
- Most programming languages have the ability to connect to databases.
- The method of connection varies by programming language, some have the ability built in while others require the installation of a library or other component in order to connect.
- In Python, we use libraries (often called connectors) that we must import before we can connect.
- For example, as we saw on the Querying a SQLite Database page we used a library called sqlite3 to connect to a SQLite database.
- For other databases we would need to use libraries explictly for those databases -- see the sections below for examples by database.
- If you need to connect to a database not listed on this page, you can usually find information about connection methods for any database using a simple Google search, like "how to connect to ____ database from Python," for example.
- Confirm you have appropriate credentials (database location, username, password, etc.)
- Next, in order to connect to most databases you need credential information which requires several pieces of information.
- The first piece of this is the location of the database. This might be a file location and file name, like we saw on the Querying a SQLite Database page. SQLite is a file-based database, so you need the full path location to the database file.
- For server-based databases, like MySQL, SQL Server, etc. the database location is usually an address, like an IP address. In a production system this might be a server on the local area network or other address provided by a System Administrator or cloud provider. If you are working with a database in your local development environment (on your laptop, for example), the address is usually localhost or 127.0.0.1.
- In addition to the database location, you normally also need a username and password, particularly for server-based database systems. In a production environment these are usually provided by a System Adminnistrator or a Database Administrator.
- And lastly, we also usually specify the name of the database we need to connect to. Depending on the access rights of the credentials you have been provided, you may not need to specify the database as part of the connection step.
- Determine the syntax needed to connect
- Once you have the appropriate credentials, next you need to determine the syntax you'll need to make the connection to the database in your code.
- There are a very large number of possible syntax combinations depending on many factors. The examples provided in the sections below are simplified to demonstrate one way of connecting for each of the databases in those sections. For a more in-depth set of options for numerous databases you can use a site like ConnectionStrings.com for more detailed inforamtion.
- Once you have the appropriate syntax write it in your program.
- Make the connection
- When you write the code in your program to connect to the database and run it, we call this making a database connection.
- When you make a connection to a database, you're opening a channel between your program and the database.
- Confirm the connection was successful
- Once we have attempted connection the database, we should confirm the connection was successful.
- The reason for this is that there are many factors our of our control regarding the database since it is external to our program.
- For example, if the database resides on a server and that server is down or not accessible for some reason, our program will not be able to connect to the database. So, we need to programmatically confirm the database connection before we proceed.
- If the connection fails, we should notify the user that there was an error. In a production system, we may have additional requirements of connection failures, such as logging the error to a log file, sending a notification to the System Administrator via a messaging system, etc.
- See the examples provided in the sections below for how to confirm the connection.
- Perform the queries or CRUD operations needed
- Once we have confirmed the connection to the database was successful, we can then run any queries or CRUD operations we need while the database connection is open.
- Close the connection
- After we have completed all of the queries or CRUD operations needed, we need to close the connection to the database.
- See the examples provided in the sections below for how to close a connection.
SQLite is a file-based database system, which means that the database is a file stored on a hard drive somewhere. That location might be on your local computer or on a server or other device.
Figure 1 depicts a development environment set up on a laptop that is not connected to any servers, that is, it is stand-alone.
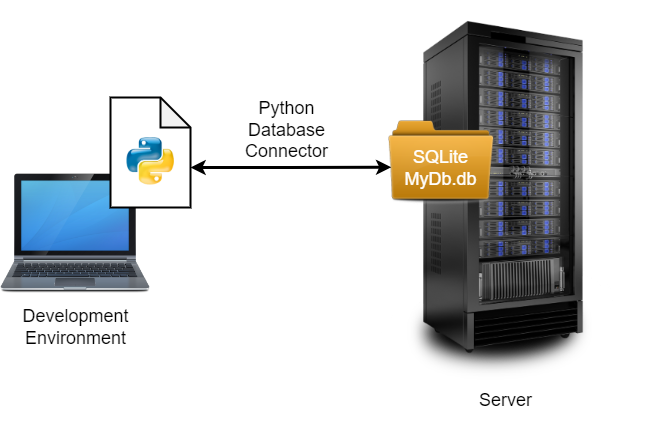
Figure 2 depicts a development environment set up on a laptop that is connected to a server which might be on a local area network or a cloud-based server.
In either of these configurations, Python is installed on the laptop and we have written a program in Python that we want to connect to the SQLite database named MyDB.db. Here are corresponding examples of Python code to connect to the examples in Figure 1 and Figure 2:
Figure 1: In this case SQLite is installed on the laptop and we store our SQLite databases in the C:\SQLite\Data\ folder.
import sqlite3
connection = sqlite3.connect("C:\SQLite\Data\MyDb.db")
cursor = connection.execute("SELECT * FROM Table;")
# Do the queries and/or CRUD operations here
.
.
.
connection.close()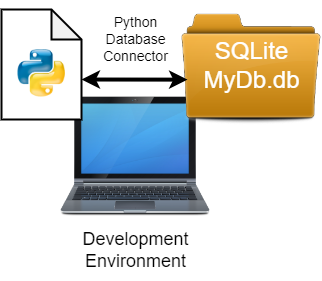
Code Details
- Code Line 1: First we import the sqlite3 library. This is the connector library for Python to connect to SQLite databases.
- Code Line 2: This line intializes a variable we'll call connection and uses the connector library's connect() method to attempt to establish a connection to the MyDb.db database based on its location in the C:\SQLite\Data\ folder.
- Code Lines 4 thru 7: This is where we would code the query or CRUD operation steps needed in order to interact with the database.
- Code Line 8: After all of the database actions are completed we use the connection object's close() method to close the connection to the database. This is an important step to complete our interaction with the database.
Figure 2: In this case SQLite is installed on the server and we store our SQLite databases in the \\ServerName\SharedFolder\Data\ folder.
import sqlite3
connection = sqlite3.connect("\\ServerName\SharedFolder\Data\MyDb.db")
cursor = connection.execute("SELECT * FROM Table;")
# Do the queries and/or CRUD operations here
.
.
.
connection.close()
Code Details
- Notice that the code for Figure 2 is nearly identical to the code for Figure 1.
- The difference is in the connect() method. The path to the location of the database file is on a server, rather than on the local computer's hard drive.
- The path to a server is usually indicated using the Universal Naming Convention (UNC) syntax, which is as shown in the code example above.
- Because SQLite databases are file-based, they can be stored anywhere that the program and user would have access to on a computer, server or cloud service.
- The rest of the code is the same as outlined above for Figure 1.
MySQL is a server-based database system, which means MySQL Server runs as a server software in the background on a computer. That server software runs 24/7 (by default) so that the database is always available. It is intended to run on either a physical server or a cloud server that is accessible by multiple users simultaneously. The use of a server-based database system like MySQL Server is normally used in a production system. This is very different than the file-based database SQLite that is just a file stored somewhere. A database server usually requires additional installation steps, maintenance, and has a more robust security layer involved as you'll seen below.
It may seem a bit confusing, but MySQL server can be installed on a local computer (desktop, laptop). The intent of running it on a local computer most of the time is for development and testing. Having it available locally, say on a laptop, allows developers to build programs that will be used in a production system with a full implementation of MySQL Server on a server or in the cloud.
Figure 3 depicts a development environment set up on a laptop that is not connected to any servers, that is, it is stand-alone.
Figure 4 depicts a development environment set up on a laptop that is connected to a server which might be on a local area network or a cloud-based server.
In either of these configurations, Python is installed on the laptop and we have written a program in Python that we want to connect to the MySQL Server database. Here are corresponding examples of Python code to connect to the examples in Figure 3 and Figure 4:
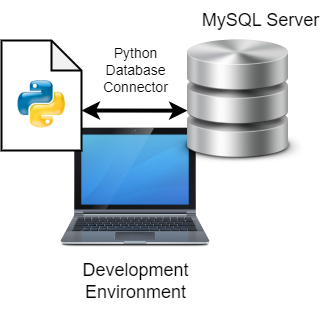

Figure 3: In this case MySQL Server is installed on the laptop, as mentioned above, likely for development and testing purposes.
import mysql.connector
myDB = mysql.connector.connect(
  host = "localhost",
  user = "validusername",
  password = "validpassword",
  database = "databasename"
)
cursor = myDB.cursor()
# Do the queries and/or CRUD operations here, like ...
cursor.execute("SELECT * FROM Table;")
result = cursor.fetchall()
.
.
.
myDB.close()
Code Details
- Code Line 1: First we import the MySQL connector library. This is the connector library for Python to connect to MySQL databases.
- Code Line 2: This line intializes a variable we'll call myDB and uses the connector library's connect() method to attempt to establish a connection to the MySQL Server.
- Code Line 3: This line is part of the connect() method and it defines the host, that is, the MySQL Server instance. This is usually localhost in cases such as this example where MySQL Server is installed locally for develoipment and testing.
- Code Line 4: This line is part of the connect() method and it specifies the user account to us to attempt to connect to the database. User accounts are created in the MySQL Server software itself and access rights appropriate for that user are set there. This differs from SQLite databases that are, by default, open (though this can be changed in SQLite).
- Code Line 5: This line is part of the connect() method and it specifies the password for the user account that is combined with the username to attempt to connect to the database.
- Code Line 6: This line specifies the database we want to connect to immediately. Since MySQL is a server-based syste, it can simultaneously host and manage multiple databases at once.
- Code Lines 2 thru 7 are all part of the MySQL Server connect() method.
- Code Line 8: This line creates a cursor object based on the MyDB connection.
- Code Line 9: This line uses the cursor object to execute() a query that will contain the results of the database query inside of the object's execute() method. In this example, that results would be all records from the Table.
- Code Line 10: This line creates a new variable called result that is an object that holds the results of the execute statement.
- Code Lines 11 thru 14: This is where we would code the query or CRUD operation steps needed in order to interact with the database.
- Code Line 15: After all of the database actions are completed we use the connection object's close() method to close the connection to the database. This is an important step to complete our interaction with the database.
import mysql.connector
myDB = mysql.connector.connect(
  host = "111.111.111.111",
  user = "validusername",
  password = "validpassword",
  database = "databasename"
)
cursor = myDB.cursor()
# Do the queries and/or CRUD operations here, like ...
cursor.execute("SELECT * FROM Table;")
result = cursor.fetchall()
.
.
.
myDB.close()
Code Details
- Notice that the code for Figure 3 is nearly identical to the code for Figure 4.
- The difference is in the connect() method where we set the host to the location of the MySQL Server on the server.
- In this example, we're using an IP address where the server is located.
- The host address can be an IP address or other valid addressing value.
- The rest of the code is the same as outlined above for Figure 3.
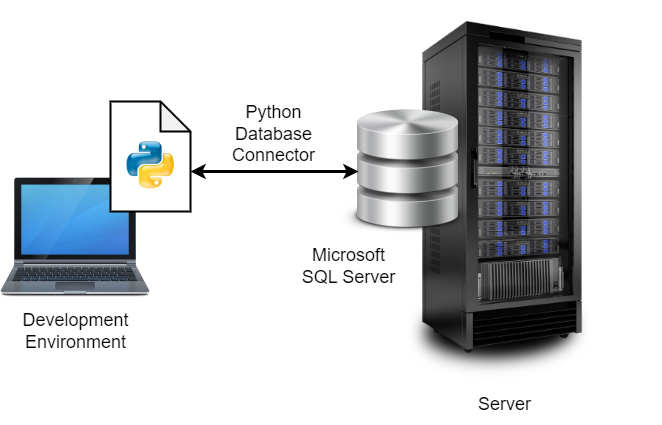
Microsoft SQL Server is a server-based database system, which means it runs as a server software in the background on a computer (usually a server). That server software runs 24/7 (by default) so that the database is always available. It is intended to run on either a physical server or a cloud server that is accessible by multiple users simultaneously. The use of a server-based database system like SQL Server is most often used in a production system. A database server usually requires additional installation steps, maintenance, and has a more robust security layer involved as you'll seen below.
It may seem a bit confusing, but SQL Server can be installed on a local computer (desktop, laptop). The intent of running it on a local computer most of the time is for development and testing. Having it available locally, say on a laptop, allows developers to build programs that will be used in a production system with a full implementation of SQL Server on a server or in the cloud.
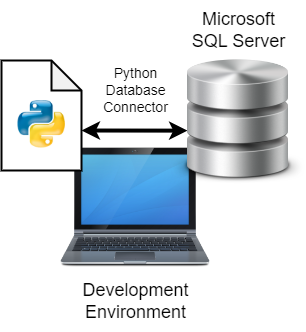
Figure 5 depicts a development environment set up on a laptop that is not connected to any servers, that is, it is stand-alone.
Figure 6 depicts a development environment set up on a laptop that is connected to a server which might be on a local area network or a cloud-based server.
In either of these configurations, Python is installed on the laptop and we have written a program in Python that we want to connect to the SQL Server database. Here are corresponding examples of Python code to connect to the examples in Figure 5 and Figure 6:
import pymssql
myDB = pymssql.connect(
host = "localhost",
user = "validusername",
password = "validpassword",
database = "databasename"
)
cursor = myDB.cursor()
# Do the queries and/or CRUD operations here, like ...
cursor.execute("SELECT * FROM Table;")
result = cursor.fetchall()
.
.
.
myDB.close()
Code Details
- Code Line 1: First we import the pymssql connector library. This is the connector library for Python to connect to SQL Server databases.
- Code Line 2: This line intializes a variable we'll call myDB and uses the connector library's connect() method to attempt to establish a connection to the SQL Server.
- Code Line 3: This line is part of the connect() method and it defines the host, that is, the SQL Server instance. This is usually localhost in cases such as this example where SQL Server is installed locally for develoipment and testing.
- Code Line 4: This line is part of the connect() method and it specifies the user account to us to attempt to connect to the database. User accounts are created in the SQL Server software itself and access rights appropriate for that user are set there.
- Code Line 5: This line is part of the connect() method and it specifies the password for the user account that is combined with the username to attempt to connect to the database.
- Code Line 6: This line specifies the database we want to connect to immediately. Since SQL Server is a server-based syste, it can simultaneously host and manage multiple databases at once.
- Code Lines 2 thru 7 are all part of the SQL Server connect() method.
- Code Line 8: This line creates a cursor object based on the MyDB connection.
- Code Line 9: This line uses the cursor object to execute() a query that will contain the results of the database query inside of the object's execute() method. In this example, that results would be all records from the Table.
- Code Line 10: This line creates a new variable called result that is an object that holds the results of the execute statement.
- Code Lines 11 thru 14: This is where we would code the query or CRUD operation steps needed in order to interact with the database.
- Code Line 15: After all of the database actions are completed we use the connection object's close() method to close the connection to the database. This is an important step to complete our interaction with the database.
import pymssql
myDB = pymssql.connect(
host = "111.111.111.111",
user = "validusername",
password = "validpassword",
database = "databasename"
)
cursor = myDB.cursor()
# Do the queries and/or CRUD operations here, like ...
cursor.execute("SELECT * FROM Table;")
result = cursor.fetchall()
.
.
.
myDB.close()
Code Details
- Notice that the code for Figure 5 is nearly identical to the code for Figure 6.
- The difference is in the connect() method where we set the host to the location of the SQL Server on the server.
- In this example, we're using an IP address where the server is located.
- The host address can be an IP address or other valid addressing value.
- The rest of the code is the same as outlined above for Figure 3.
Cloud vendors like Amazon Web Services (AWS), Microsoft Azure, and Google Cloud Services offer many database options as part of their service packages. Since they are cloud-based, any database connections to them require credentials are set up in their cloud system ahead of time--like the MySQL and SQL Server examples above. Also, there can be different connectors for Python depending on which cloud database option you choose. For the purposes of demonstration, I will use AWS RDS as an example here, but remember that some details (particularly the connection aspect) may be different for different database options and cloud system providers. Usually you can find examples of how to connect to those services in their help documentation.
Figure 7 depicts a development environment set up on a laptop that is connected to an AWS server RDS database instance.
import psycopg2
myDB = psycopg2.connect(
host = "your-rds-hostname.us-west-2.rds.amazonaws.com",
port = 5432,
user = "validusername",
password = "validpassword",
database = "databasename"
)
cursor = myDB.cursor()
# Do the queries and/or CRUD operations here, like ...
cursor.execute("SELECT * FROM Table;")
result = cursor.fetchall()
.
.
.
myDB.close()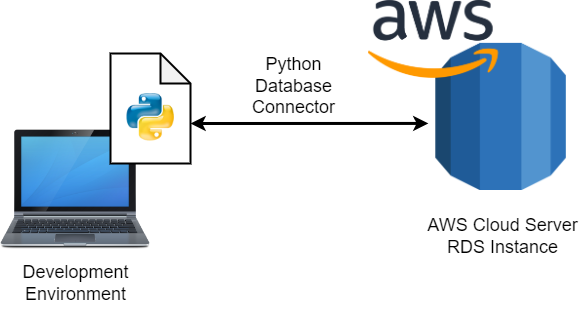
Code Details
- Code Line 1: First we import the psycopg2 connector library. This is the connector library for Python to connect to AWS RDS databases.
- Code Line 2: This line intializes a variable we'll call myDB and uses the connector library's connect() method to attempt to establish a connection to the AWS RDS.
- Code Line 3: This line is part of the connect() method and it defines the host, that is, the AWS RDS. Since AWS RDS is cloud-based, the address (endpoint) is dependent on your AWS account and chosen data center.
- Code Line 4: This line is part of the connect() method and it specifies the user account to us to attempt to connect to the database. User accounts are created in AWS RDS itself and access rights appropriate for that user are set there.
- Code Line 5: This line is part of the connect() method and it specifies the password for the user account that is combined with the username to attempt to connect to the database.
- Code Line 6: This line specifies the database we want to connect to immediately. Since AWS RDS is a server-based syste, it can simultaneously host and manage multiple databases at once.
- Code Lines 2 thru 7 are all part of the AWS RDS connect() method.
- Code Line 8: This line creates a cursor object based on the MyDB connection.
- Code Line 9: This line uses the cursor object to execute() a query that will contain the results of the database query inside of the object's execute() method. In this example, that results would be all records from the Table.
- Code Line 10: This line creates a new variable called result that is an object that holds the results of the execute statement.
- Code Lines 11 thru 14: This is where we would code the query or CRUD operation steps needed in order to interact with the database.
- Code Line 15: After all of the database actions are completed we use the connection object's close() method to close the connection to the database. This is an important step to complete our interaction with the database.