


Table of Contents » Appendices : GitHub
Appendix F
GitHub
Contents
- Overview
- Creating a GitHub Account
- The GitHub Web Interface
- Creating a Repository
- Creating a Repository Subfolder
- Uploading Files & Folders
- Cloning a Repository
- Downloading a Repository
- Downloading a Single File
- Using Raw
- Inviting a Collaborator
- Deleting a Repository
- Creating a Personal Access Token (PAT)

As explained above, Git is the underlying source code control technology that allows us to have repositories, clone them and collaborate with others in our programming projects. GitHub is one of many services that provide cloud-based distributed storage and sharing of Git repositories. It is important to understand the difference between Git and GitHub. As a student, you can use the GitHub services for free and build up a portfolio of projects from your classes which you can use as a demonstration of your skills for job interviews, internship applications, etc.
In order to use GitHub, you'll need to create an account. You can create a free account that we can use to collaborate with our projects in this class. To create an account follow these steps:
- Go to Github.com
- Click Sign Up (top right of the screen)
- Fill out the form.
- Note: The username is the key field that must be unique, their system will tell you if what you type is already in use or not.
- You can choose the Free Plan or if you're a student at a college or university I recommend the Student Plan.
- And complete the process of creating your account.
When you have completed creating your account next you'll see the GitHub web interface.
One of the ways you can interact with GitHub is through its web interface. The web interface allows you to manage all aspects of your GitHub account. When you first access the web interface it will look something like the following (Note: This is subject to change by GitHub. The examples below were captured in January 2022 of a new free plan account. If you choose to use a student plan or pro plan, the web interface is likely different.):
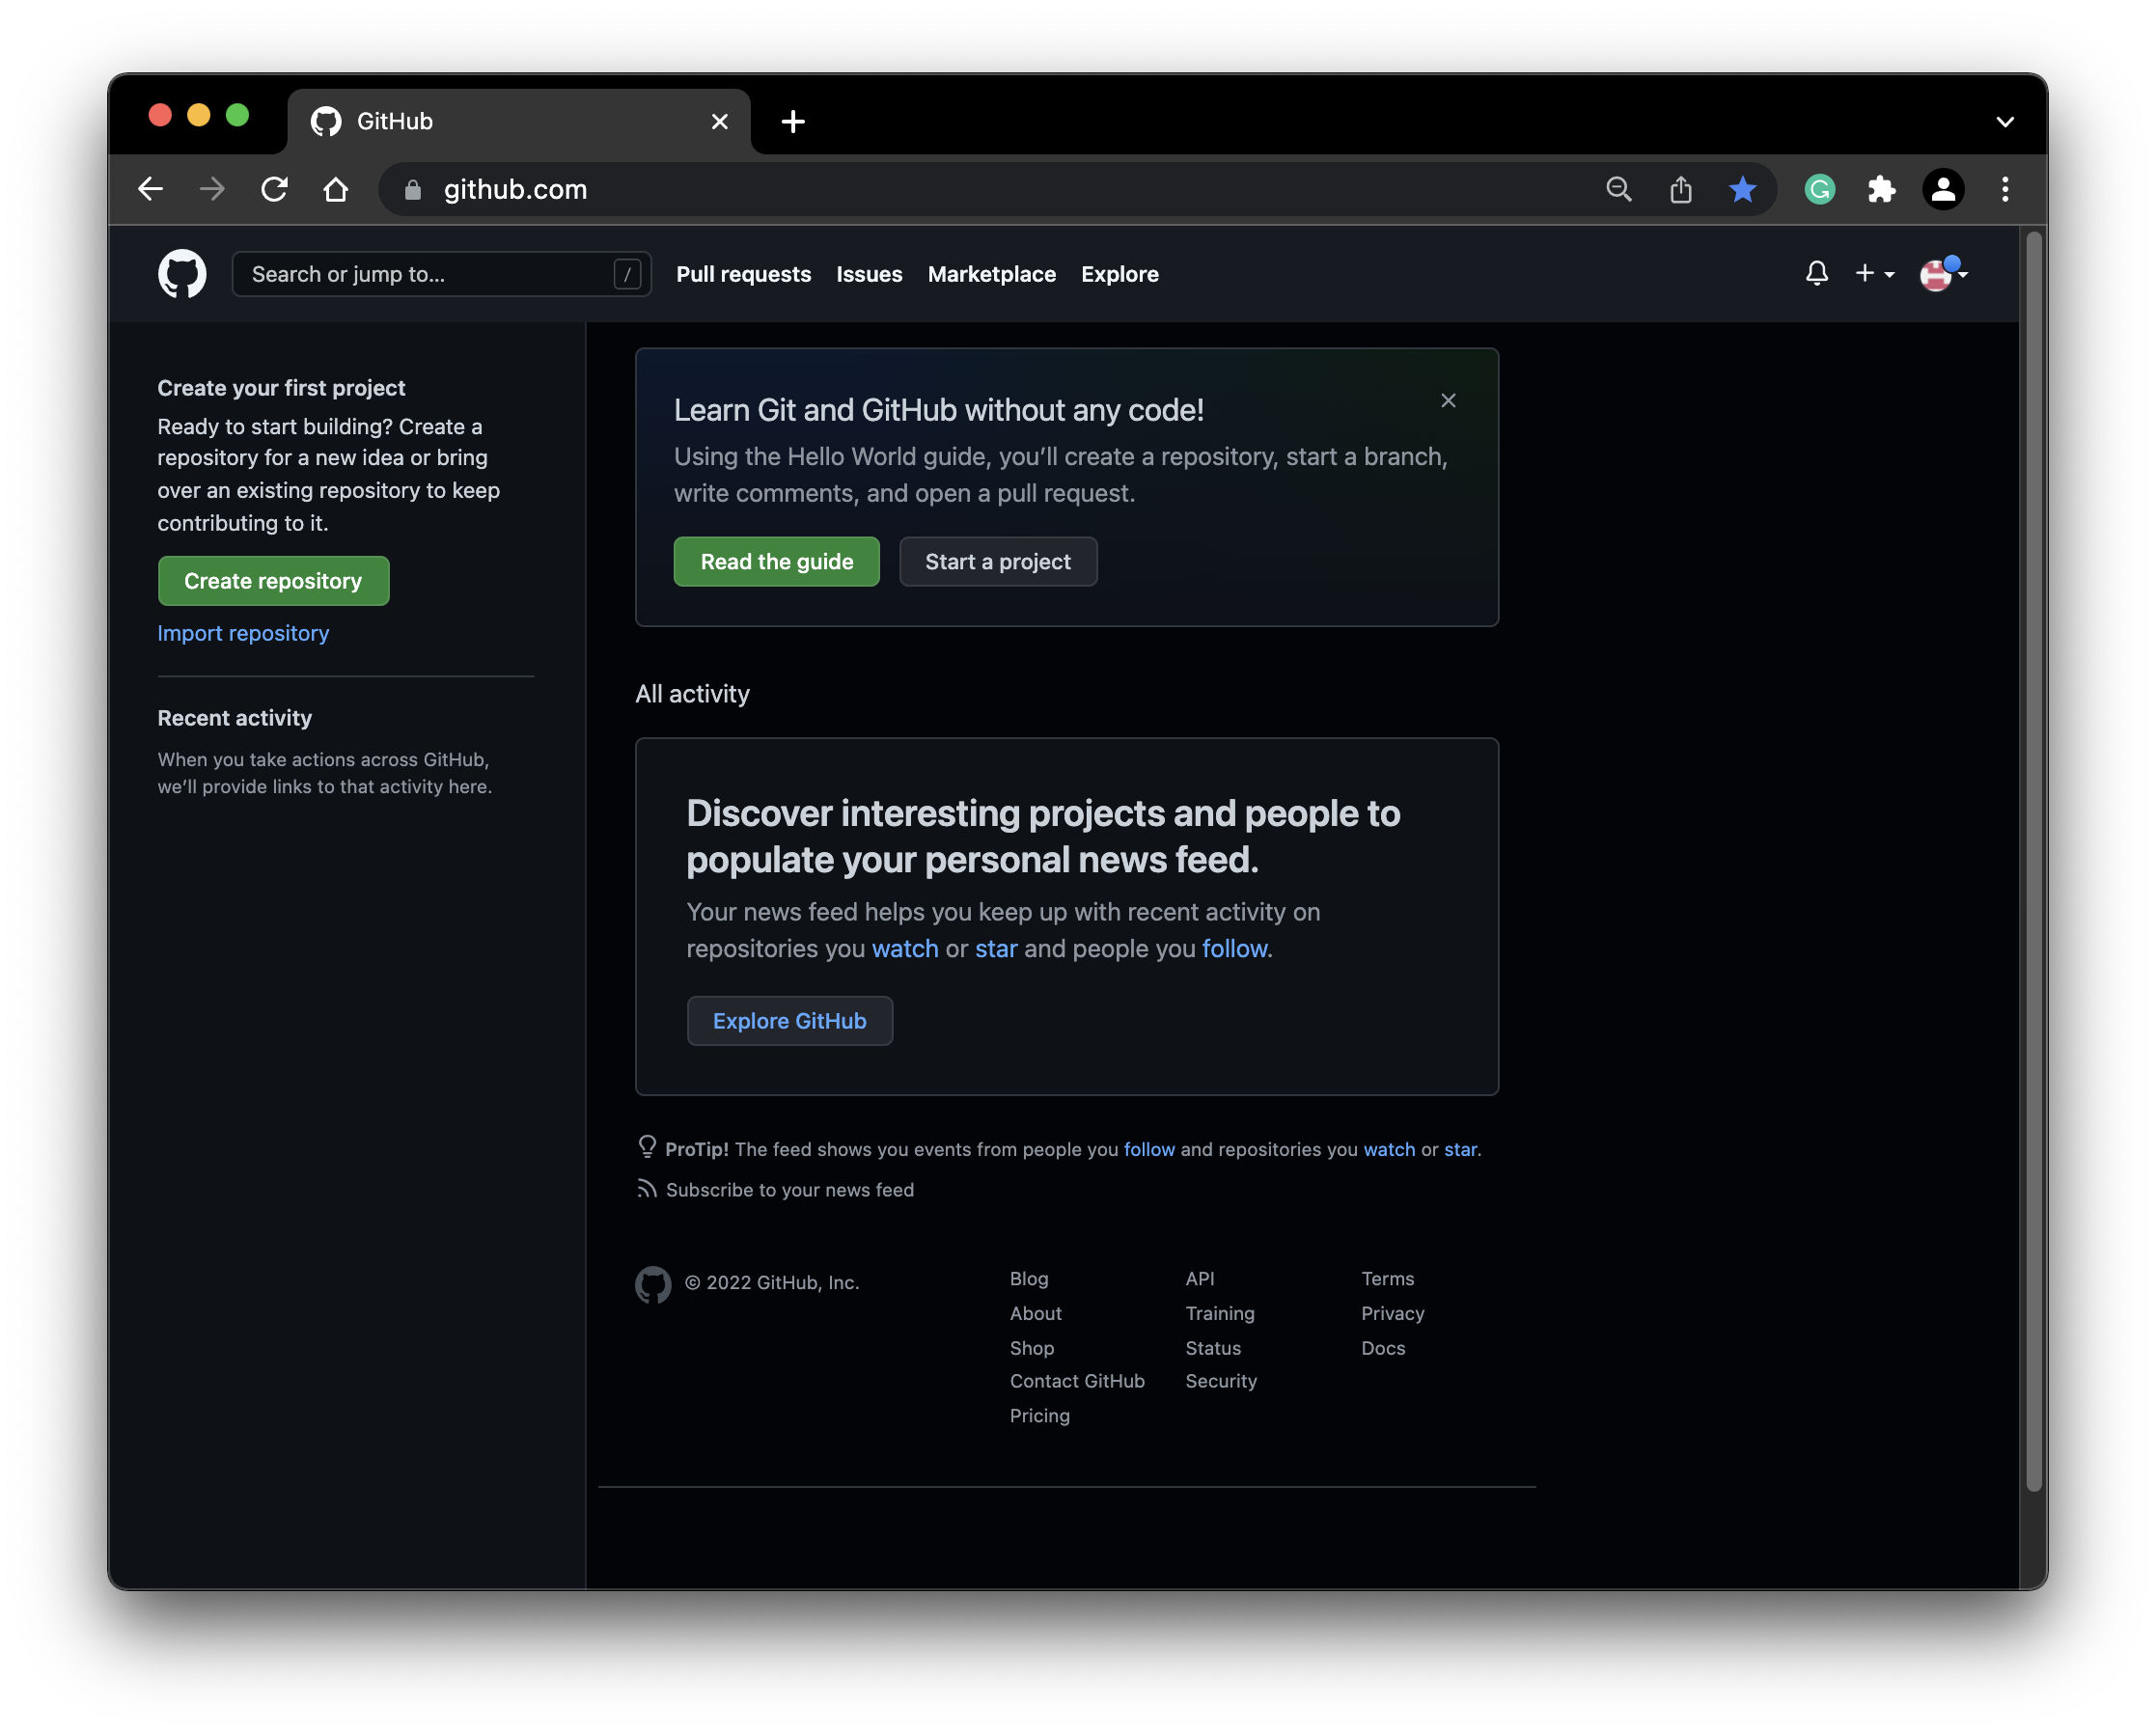
Next we'll take a look at a few common features of using GitHub and its web interface.
First let's create a new repository using the web interface. Since we're using the web interface, the repository will be created within GitHub. This will have no effect on my local computer, yet. Refer to the screen capture above, the first step is to click the Create Repository button. The Create a new repository screen will appear:
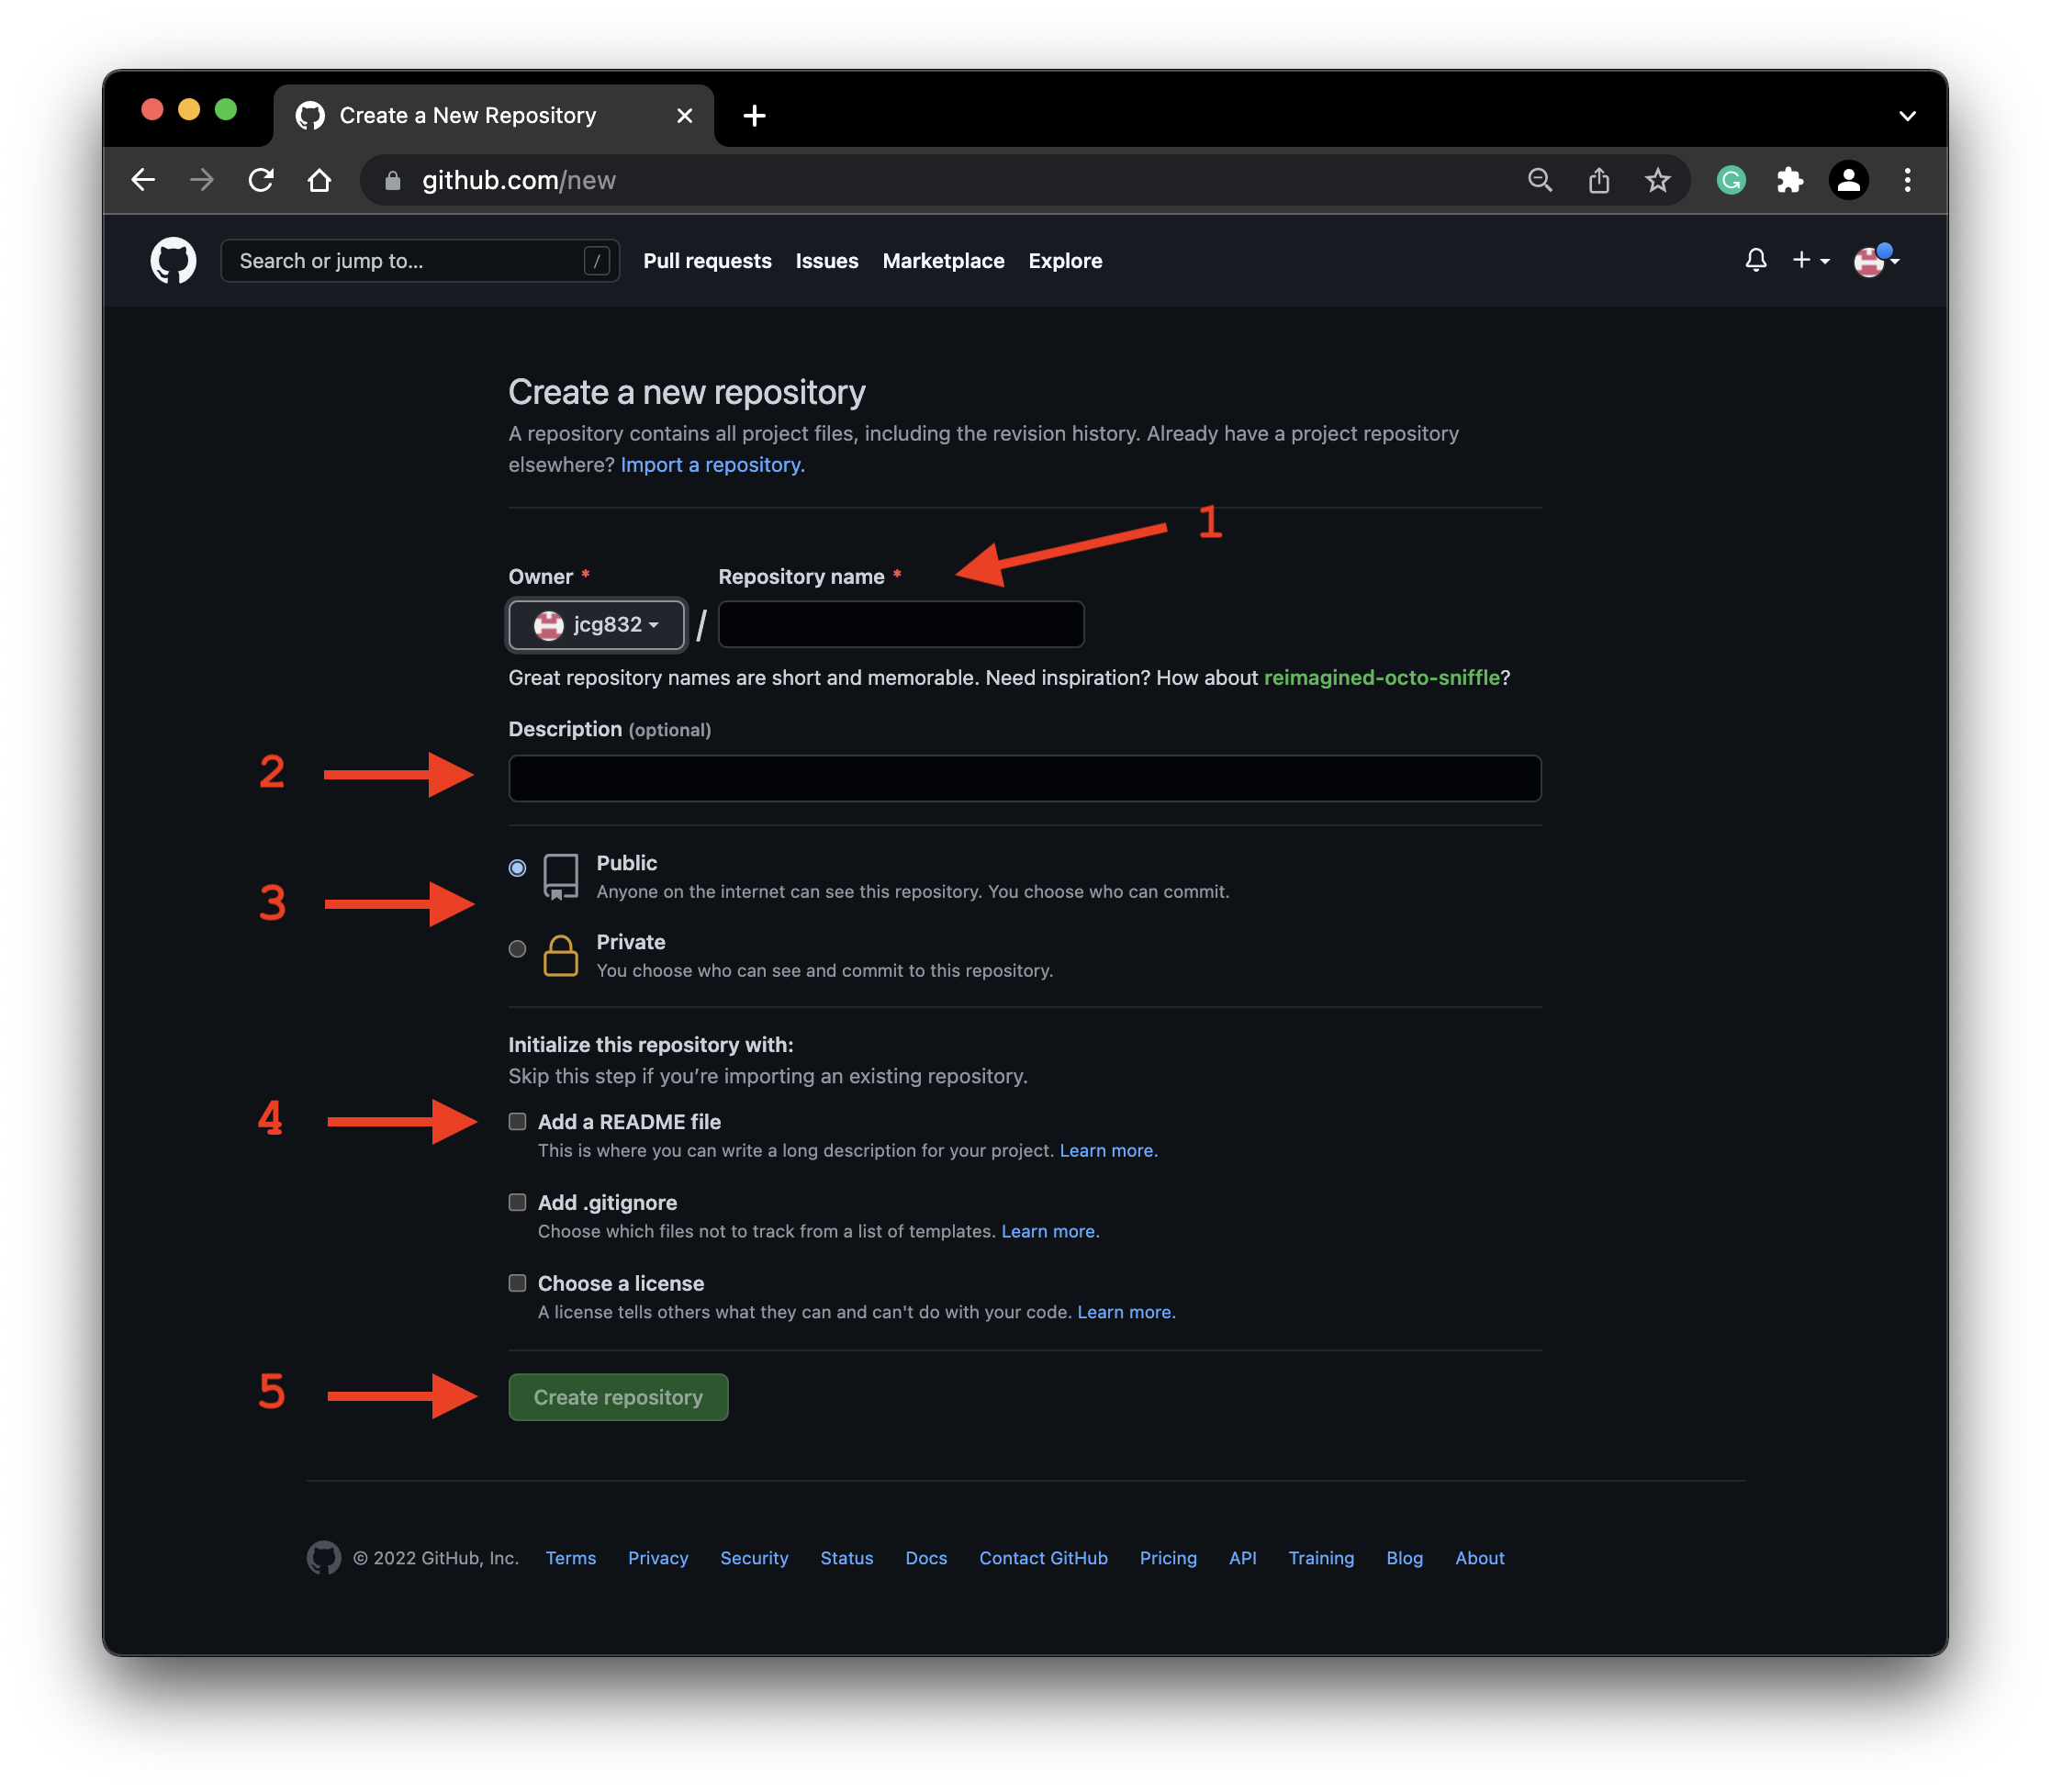
There are a number of options available when creating a repository. I will outline the key options you'll need to work with at first.
- The first field is the repository name. This will create a folder under your account's root named as you specify here.
- The Description field allows you to enter text that describes your repository. This is beneficial especially if you are going to make our repository public or share a private resository with others.
- The next decision to make is whether you want your repository public or private. If you set it to public, anyone on GitHub will have access to it, whereas Private will set it to be available only to you and anyone you explicitly invite to your repository.
- GitHub repositories generally have a readme file which is where you put a description and other information about the repository.
- When you are satisfied with your choices above, click the Create Repository button.
In the next screen capture below I have filled out the page with information for a sample project:
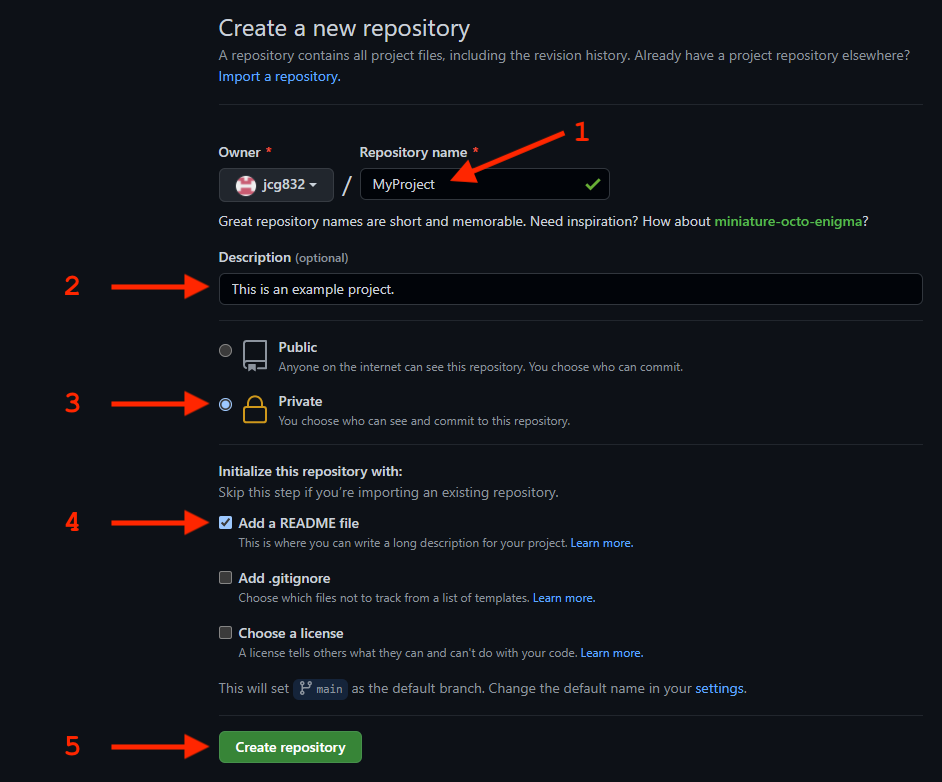
- I entered MyProject for the name of my repository.
- I entered a description for the repository.
- I set the repository to Private.
- I chose to include a Readme file.
- And I clicked Create Repository.
When the repository is created the new repository screen looks like this:
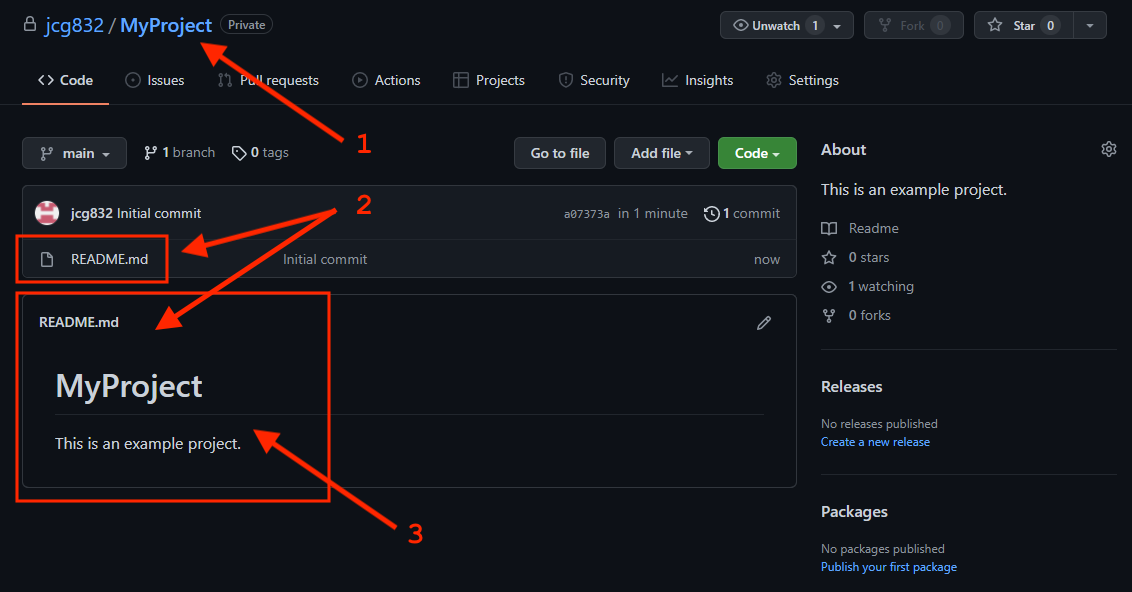
Notice the following details:
- The repository name was used to create a subfolder of my GitHub account.
- The Readme file was created and is a file now inside of my new repository folder.
- The repository name and the description I entered are the content of the Readme file. I can edit this file with the Pen icon that appears to the right of the Readme file name. Many repository Readme files contain details about the project, the contents of the project, instructions for how to use the contents of the project, etc.
If I click my GitHub name at the top left of the web interface it returns me to my main GitHub page:
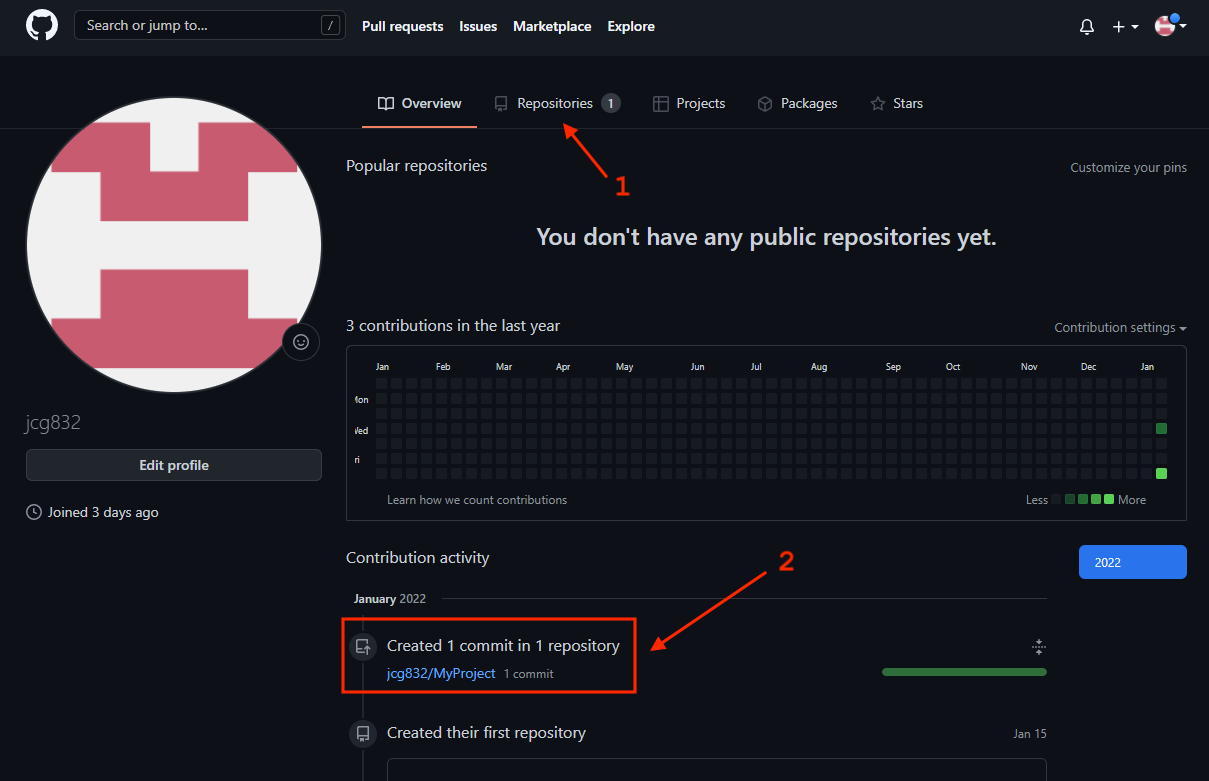
Notice the following details:
- The Repositories tab now indicates that I have 1 repository.
- The Contributions Activity displays the first commit, that is, the new creation of the first repository. I can return to my repository by clicking its name in the Contributions Activity list.
If I now click the Repositories tab I'll see the Repositories page. As I create additional repositories this is a good tab to see them all together.
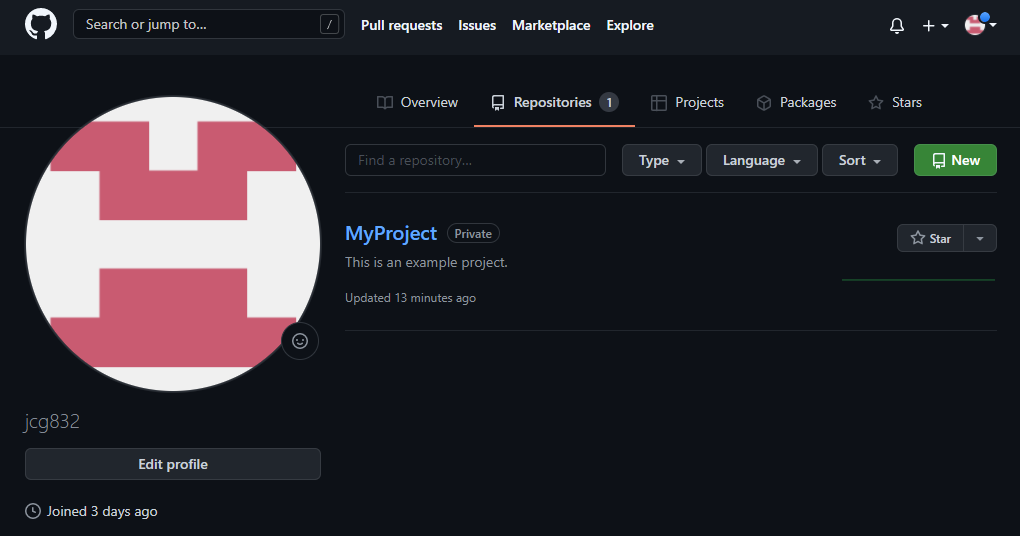
I can open any of my repositories from here as well by clicking its name.
We will explore more about the web interface below.
If I need a new subfolder inside of a repository and I want to create that new folder in the web interface (there are other ways to do this outside of the web interface we'll explore on other pages of this eBook), it is not very intuitive how we go about it. There is no feature in the web interface to create an empty folder directly, but we can in a round-about way as follows:
- Open the repository.
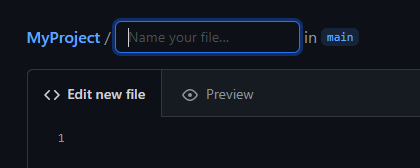
- Click the Add File button and choose Create new file from the drop-down menu.
- The New File screen appears with a box to enter a file name, like this:
To create a subfolder, we must create a file (odd, I know). GitHub will create a subfolder if we precede a file name with a subfolder name that does not yet exist. So, for example, let's say I want a subfolder called images where I plan to store image files. I can create the subfolder like this:
- Type the subfolder name I want (images in my example),
- I press the / key. This indicates to GitHub that what I have typed so far (images) is a subfolder name. Since it does not yet exist, it will be created when I finish.
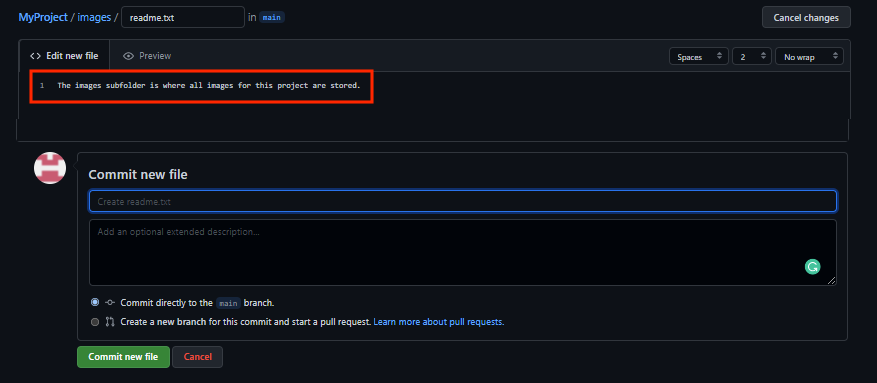
- Then I have to create a file. So, even though I intend this subfolder will be used for images, I'll create a readme file just so that this will work. I type readme.txt.
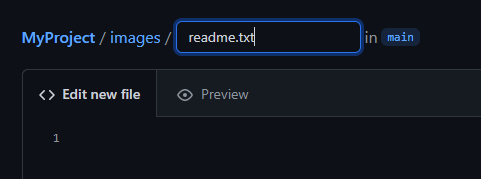
- I can type information I want stored in this file. In this example, since it is a readme file, I'll type a brief description of what will be in the subfolder I am creating.
- Then, scroll to the bottom of the screen and click the Commit new file button.
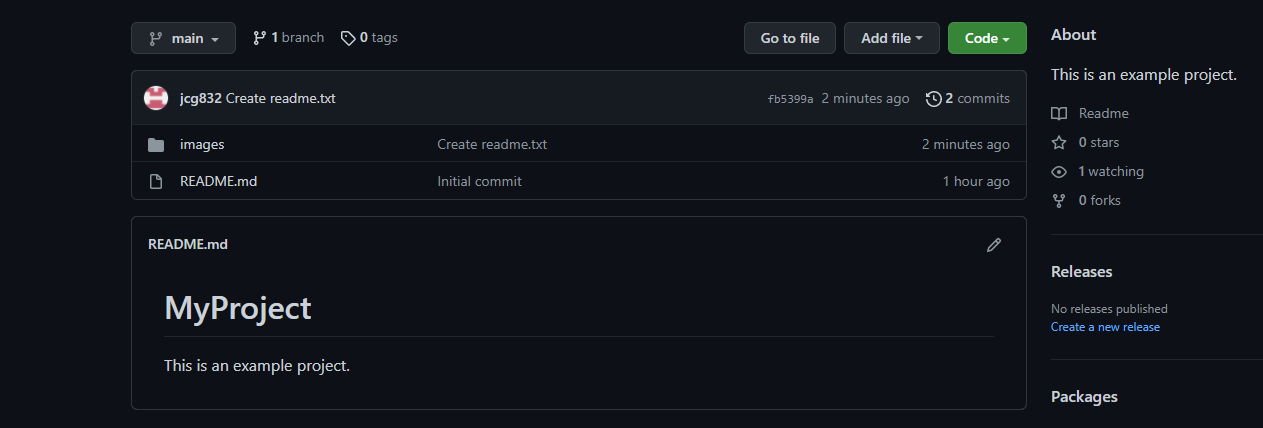
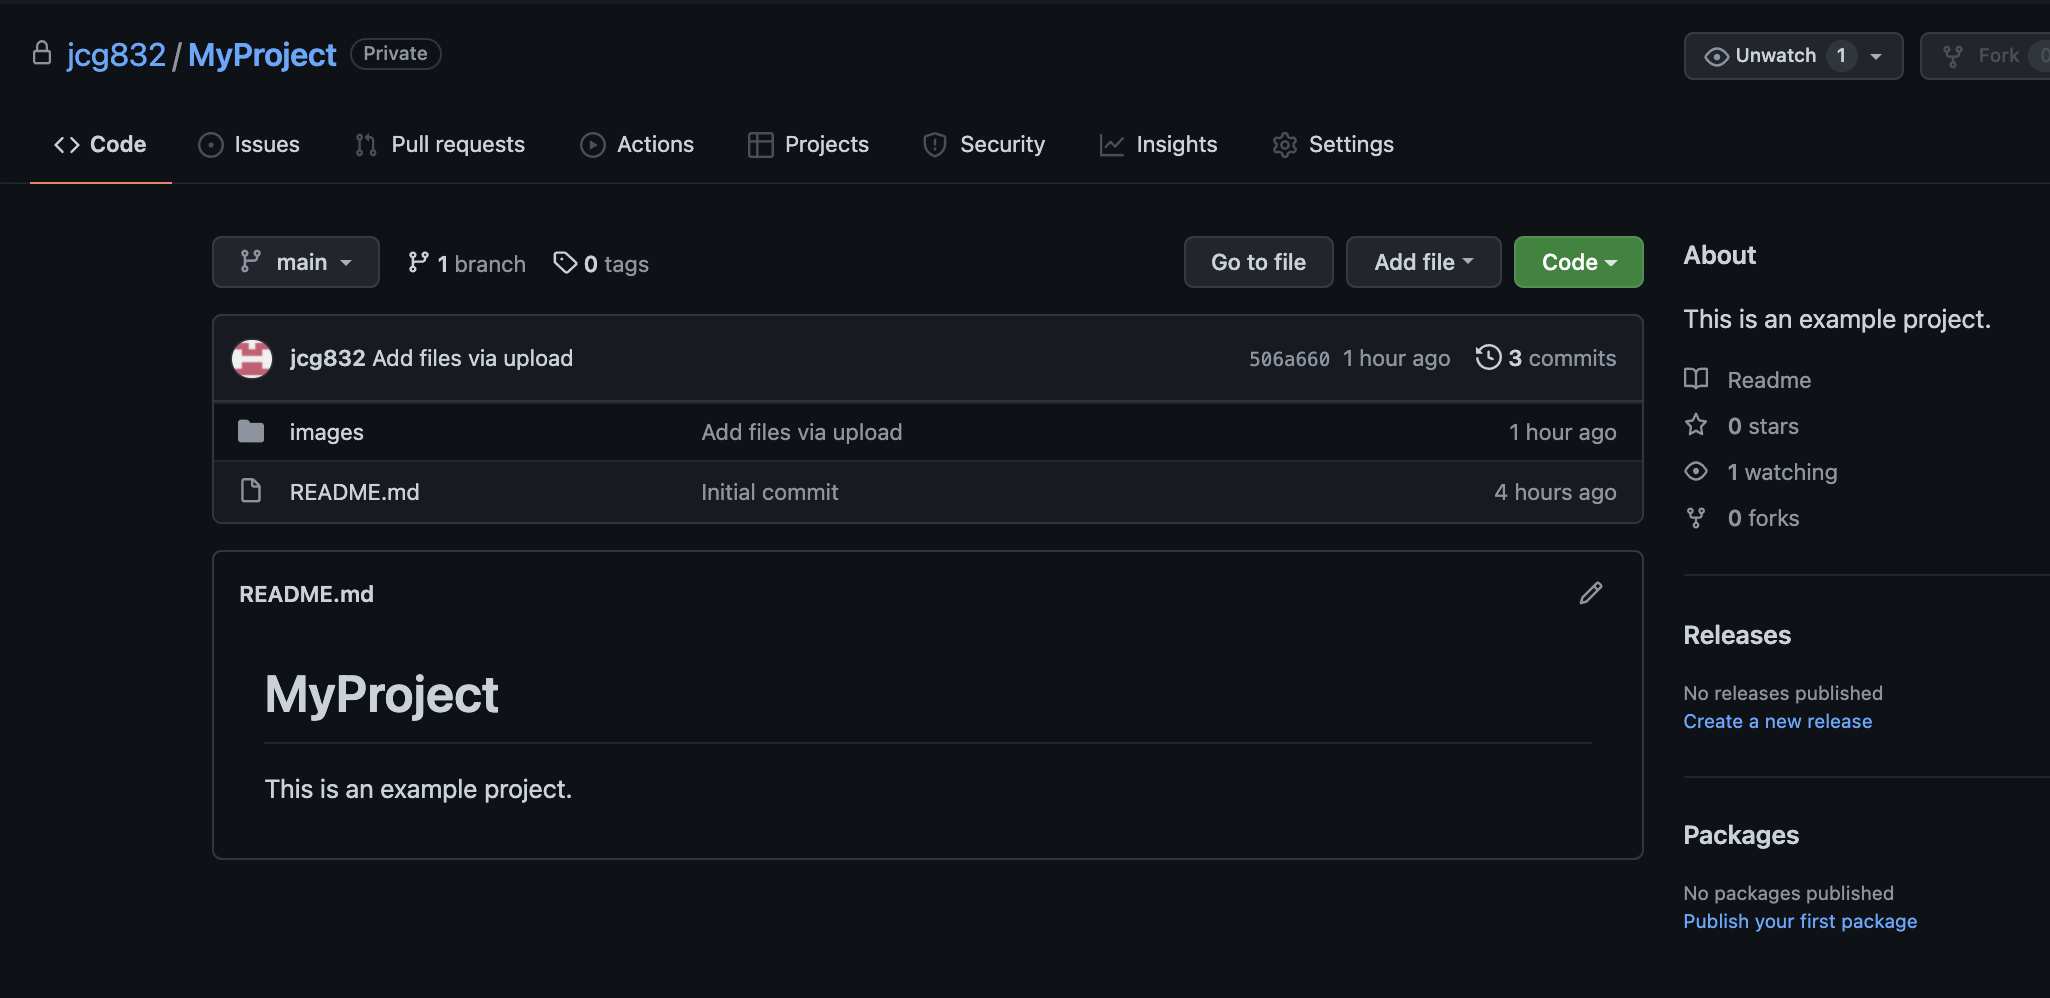
The readme.txt file is created as well as the images subfolder since it did not exist previously.

If I click on MyProject now, I'll see the contents of the repository which now includes the new subfolder:
While not very intuitive, it's easy to create new subfolders once you get the hang of it.
Now that we have a repository there are a number of ways in which we can add files to it. For now, I'll show you how to add files with the web interface. You can find other approaches using external tools such as the GitHub Desktop software and other software tools that integrate with GitHub such as text editors, Integrated Development Environments (IDEs), etc.
Let's say I want to add a couple of image files to my repository and store them in the images subfolder created above. I'll use drag-n-drop with the web interface to add the files, like this:
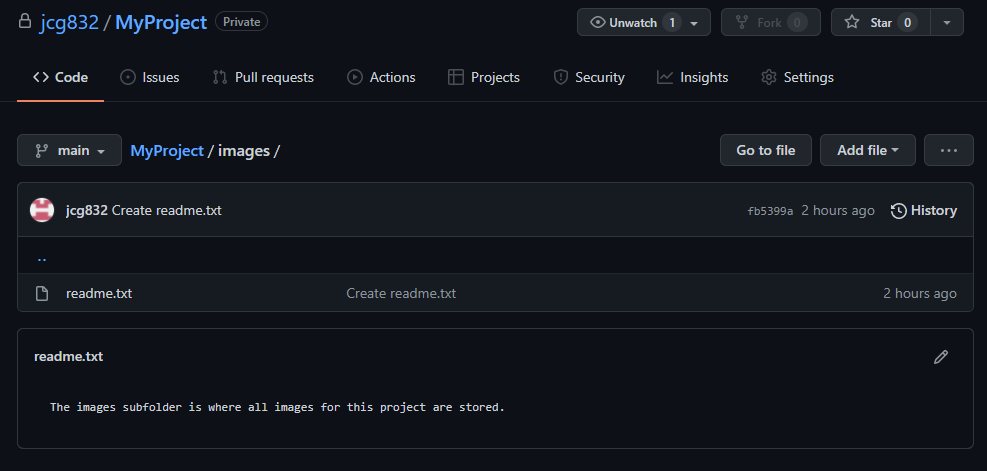
- I open my repository and then click on the subfolder images which opens that subfolder.
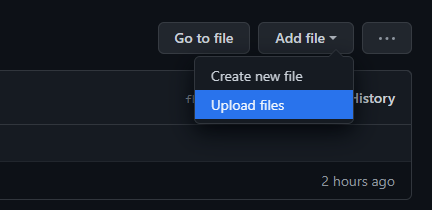
- Next I click on the Add File button and select the Upload Files option from the drop-down menu.
- The Upload Files screen appears:

- I can either use drag-n-drop to drag files from my computer to the folder, or I can use the choose your files option to open a navigation dialog. For this example I'll use the drag files option.
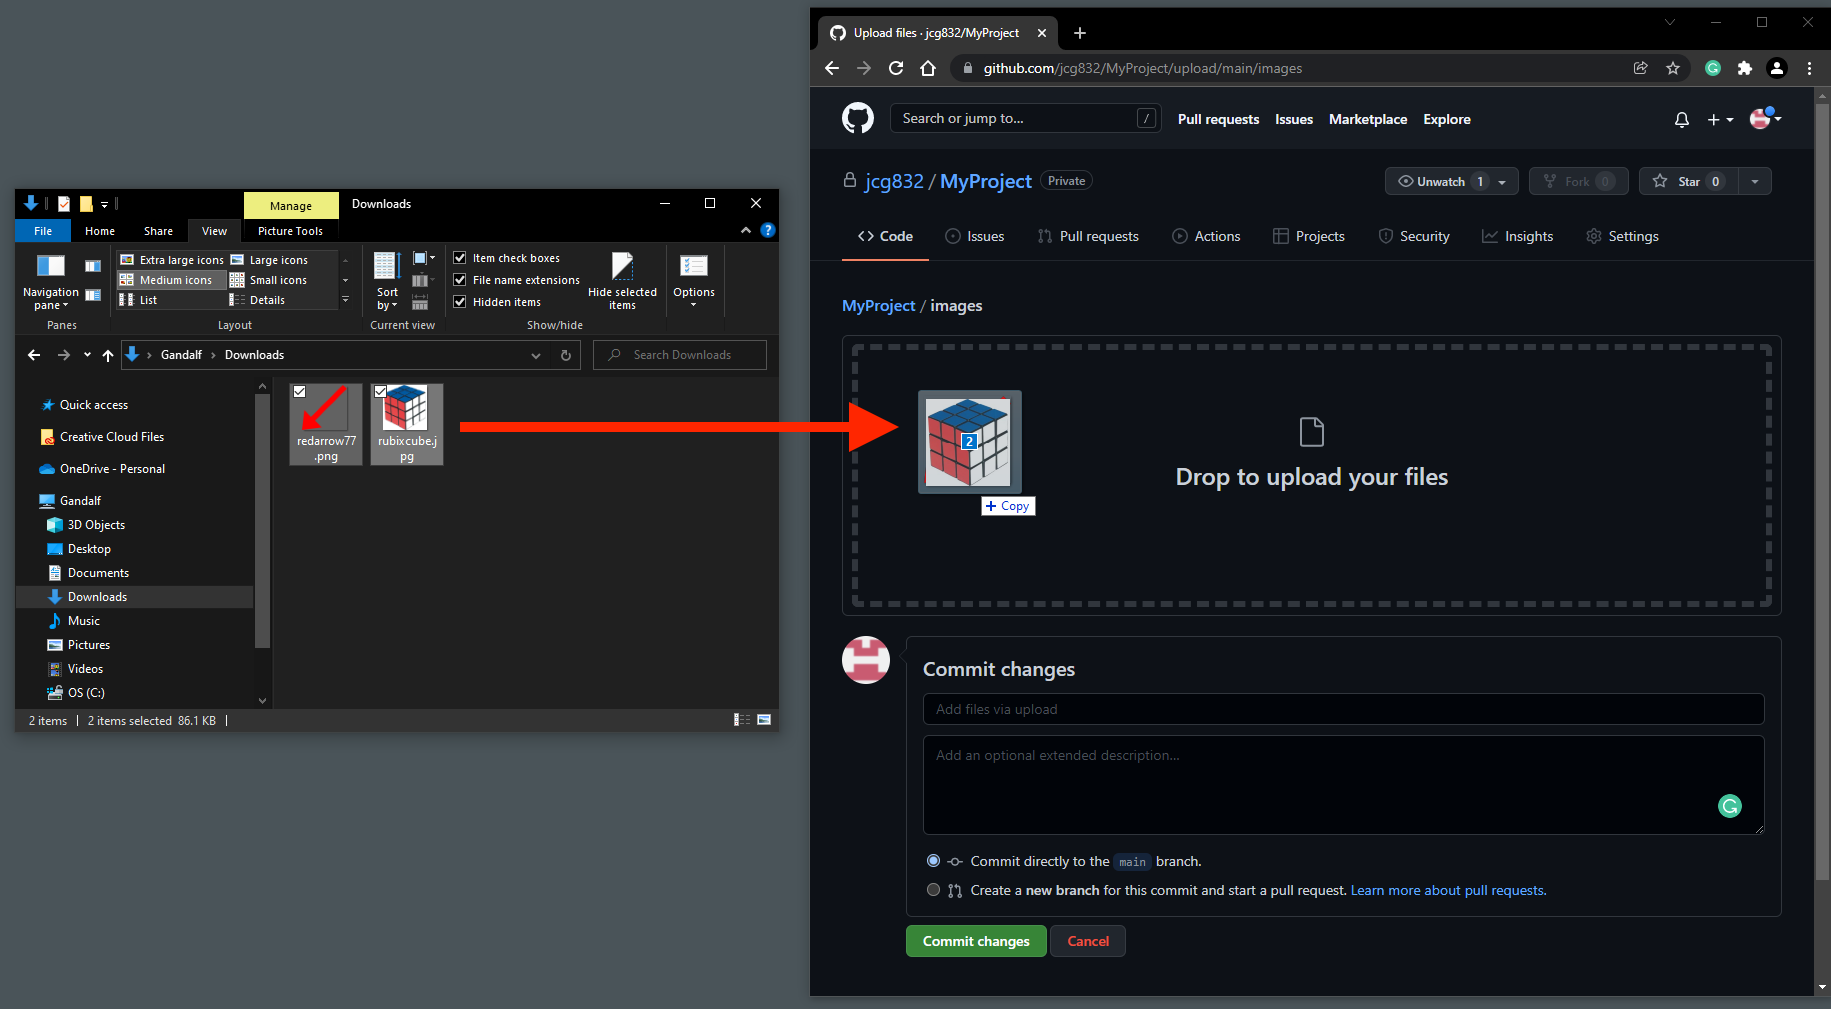
- In the above screen capture I dragged two image files from my computer to the GitHub interface. The files upload and then display the newly added files on the screen.
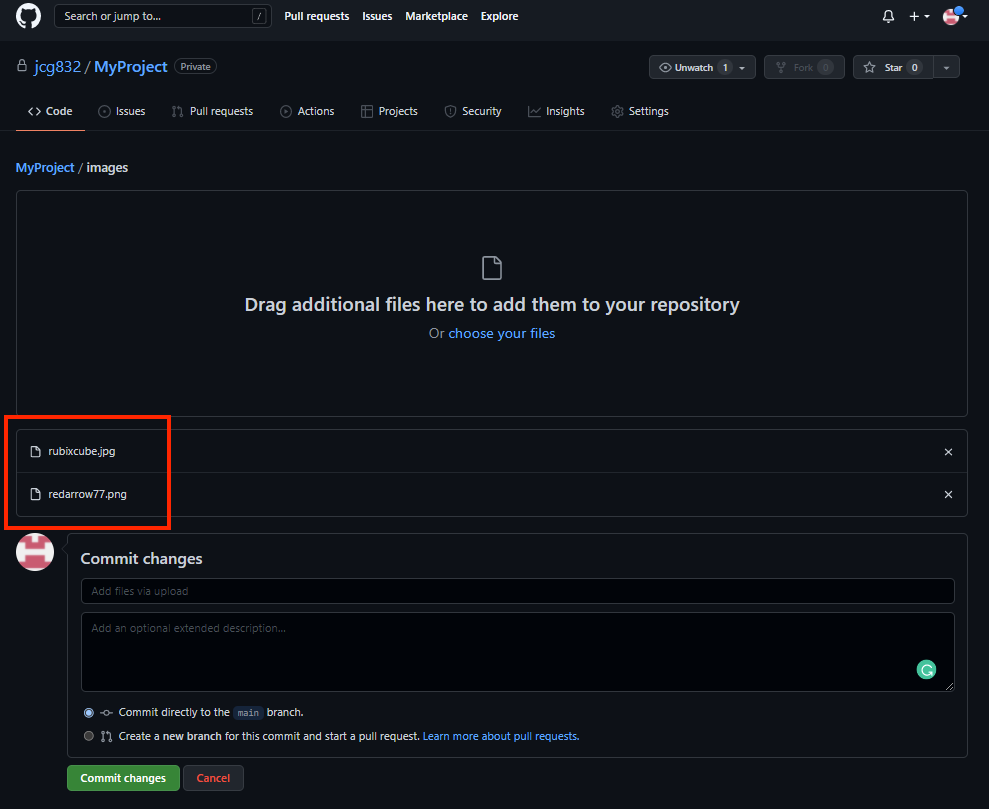
- Next I click the Commit changes button:
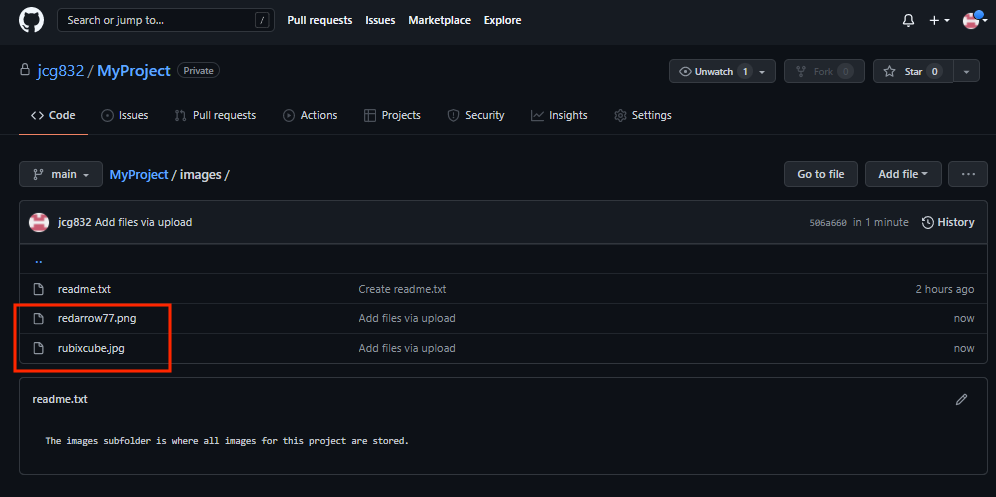
- And now I see the two files in the folder.
We can repeat this process for any files, of any file type, we want to upload to our repository. As a reminder, here are the repeatable steps:
- Open (or create) the repository and subfolder (if applicable) in the GitHub web interface where you want the files stored.
- On your computer locate the file(s) you want to upload.
- Drag the files from your computer to the GitHub web interface.
- Click the Commit Changes button.
Cloning a repository means to download a full copy of the repository to your local computer, which also maintains a connection to the remote repository. Cloning allows you to push changes to the remote repository on GitHub from your computer and also to pull changes to your computer from the remote repository that are made by others. Cloning from the web interface requires a tool on your computer's side in order to receive the cloned repository. There are many tools that can do this, like text editors, Integrated Development Environments (IDEs), GitHub Desktop, etc.
Downloading a repository means to download a copy of the entire repository, however this is different from cloning (see above). While cloning maintains a connection to the remote repository from your computer so that you can push and pull changes, downloading does not maintain a connection. So, when you download, you are making a snapshot copy of the repository. You will not be made aware of any subsequent changes to the repository from anyone else.
To download a repository from the web interface do the following:
- In the web interface, navigate to the main folder for the repository you want to download. In the following example I'll download my MyProject repository.
- I click the Code button and then choose Download ZIP from the drop-down menu.
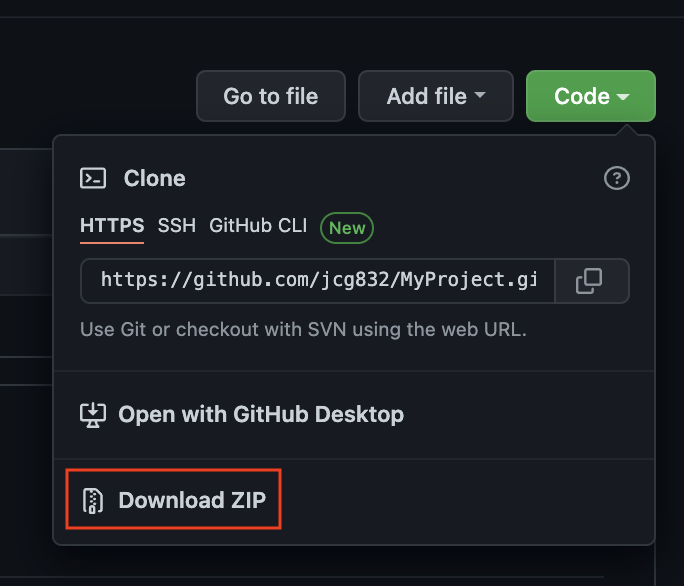
- The repository will be downloaded as a single ZIP file automatically named with the repository name and the branch. In this example, the ZIP file was named myproject-main.zip. The file is normally downloaded to the Downloads folder on your computer.
Downloading a single file from a GitHub repository is different depending on the type of file you are trying to download. Sometimes this takes some experimentation to find the way to download it, but here are some tips for downloading files based on their file type.
- Plain text files (.txt, .c, .cpp, .java, .py, etc.):
- Right-click on the file name in the repository list.
- Select Save Link As....
- In the dialog that appears, navigate to the location on your local computer where you want the file saved.
- Click the Save button.
- Non-text files (.jpg, .png, .docx, .xls, etc.):
- Click on the file name you want to download.
- The screen will change.
- Click the Download button.
- If it is an image file the image will appear, b>Right-click on the image and Select Save Image As.... In the dialog that appears, navigate to the location on your local computer where you want the file saved. Click the Save button.
- If the file is not an image, it will download automatically and you should find it in your Downloads folder.
Raw on GitHub is a way to open a text-based file (.txt, .c, .cpp, .java, .py, etc.) in its raw form. This is useful when you want to copy the contents of a text-based file. Here are some tips for using Raw:
- If you click on a file in a GitHub repository that is text-based (.txt, .c, .cpp, .java, .py, etc.) you'll see a button labeled Raw.
- Clicking on the Raw button will open the file in its raw form in the browser.
- To copy the raw (plain-text) contents you can do either of the following:
- Right-click anywhere in the browser page where the raw text is displayed and select Save as. In the dialog that appears, navigate to the location on your local computer where you want the file saved. You can change the file name in the Save as text box, and then click the Save button.
- or
- Press Ctrl + A (Windows & Linux) or Cmd + A (Mac) to highlight the entire contents of the file in the browser window. And then press Ctrl + C (Windows & Linux) or Cmd + C (Mac) to copy the content. Then you can go to any application on your computer that can paste text (editor, IDE, etc.) and in a file in that application press Ctrl + V (Windows & Linux) or Cmd + V (Mac).
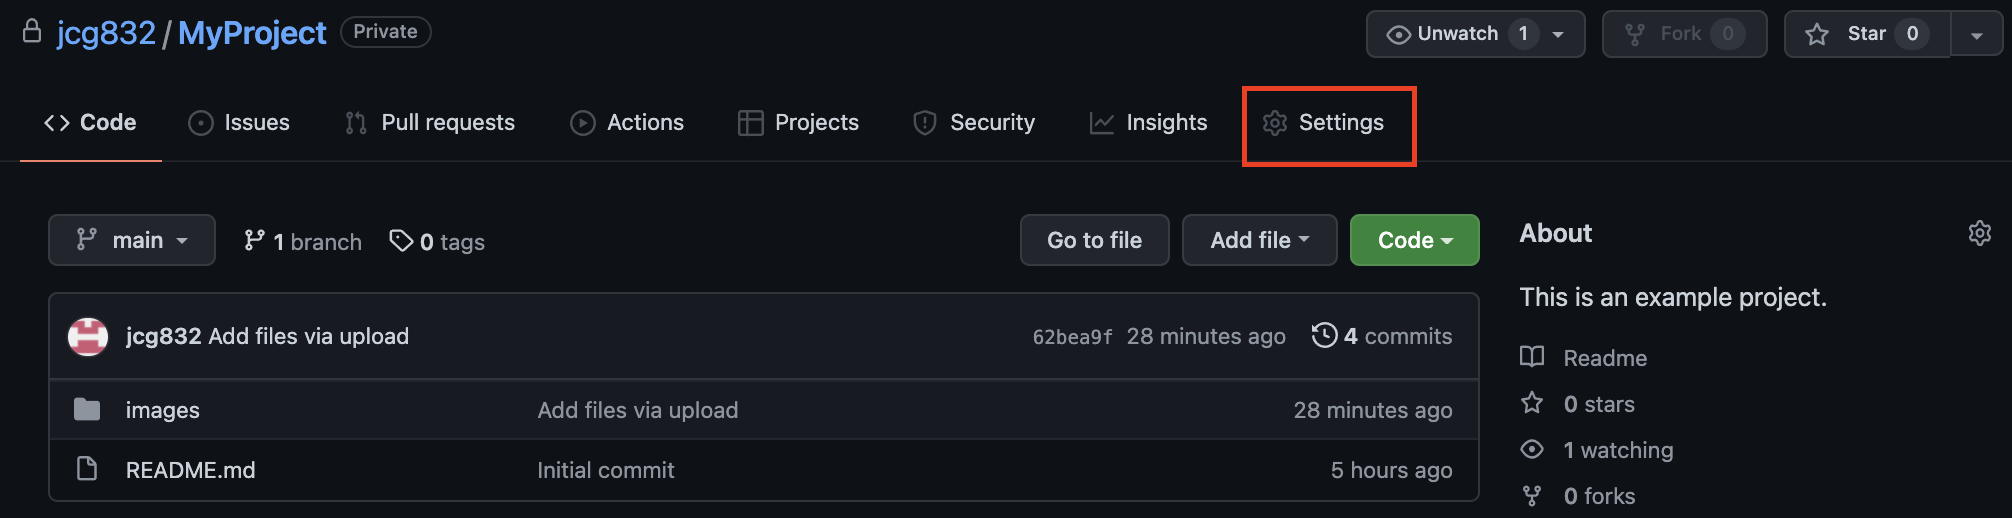
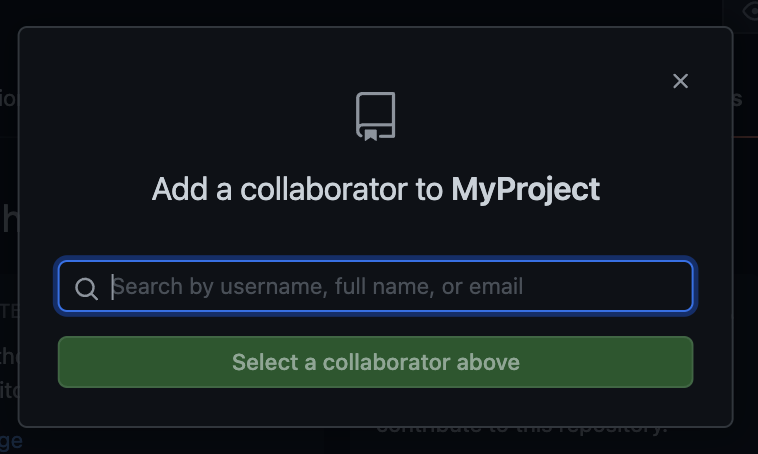
When you have created a private repository it is not available to anyone else. However, you can invite Collaborators. A collaborator will receive an invitation to join your repository so that they will have access to it. To inviate a collaborator for these steps:
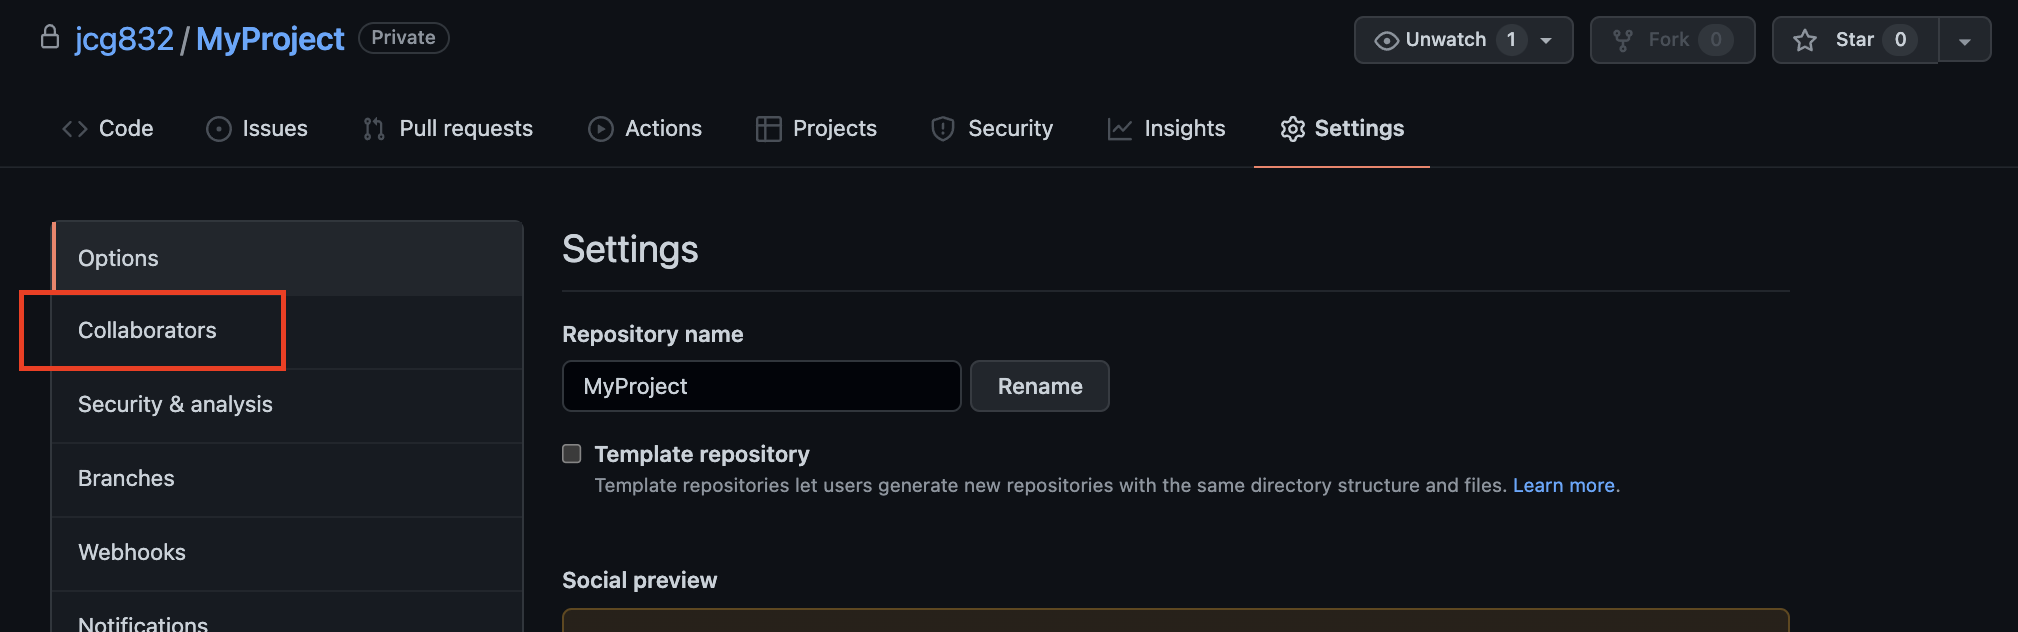
- In the GitHub web interface navigate to the repository that you want to invite a collaborator to and click the Settings button.
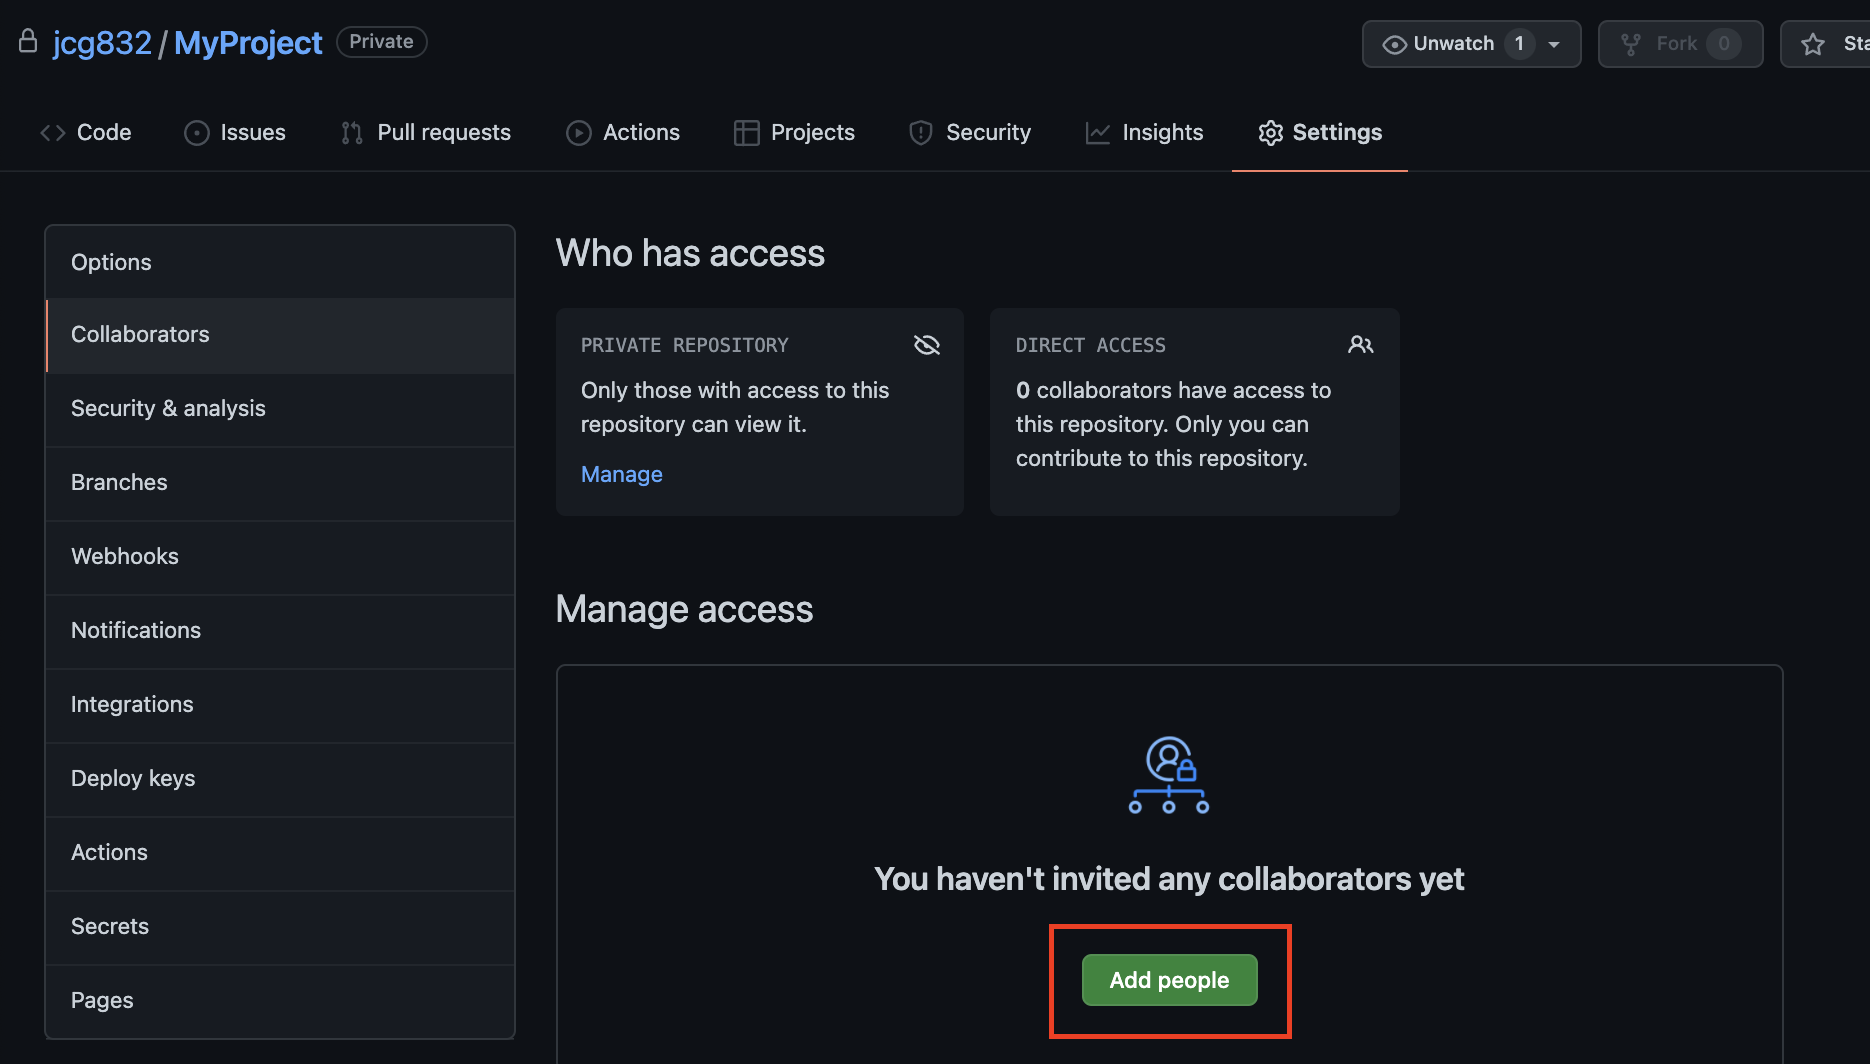
- On the Settings page click Collaborators.
- You may be asked to confirm your password.
- Next, click the Add People button.
- You must enter a valid GitHub user name of the person who you want to invite as a collaborator.
- In the following example I enter my teaching user name.
- GitHub confirms the user name exists and if it does it confirms with you. If it is the correct name, click the Add _____ to this repository button.
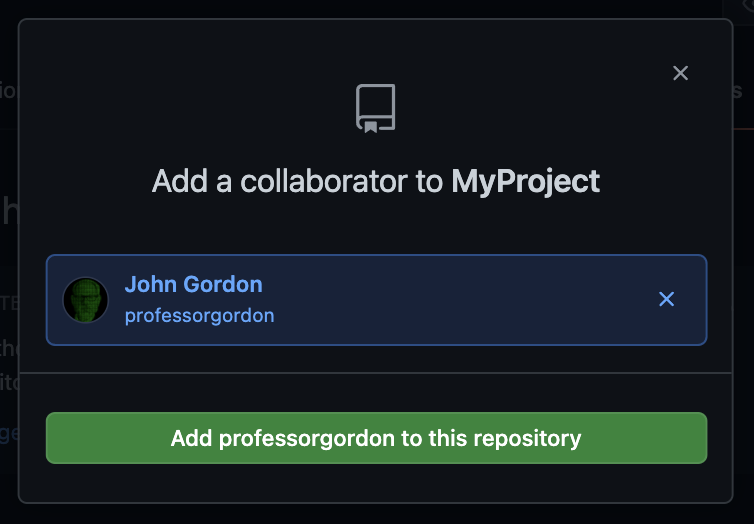
- When I click button GitHub automatically sends an invitation to the invited user to the email address associated with their GitHub account.
- The invitation is listed in the Manage Access list and it will indicate Pending invite until the user responds to the email.
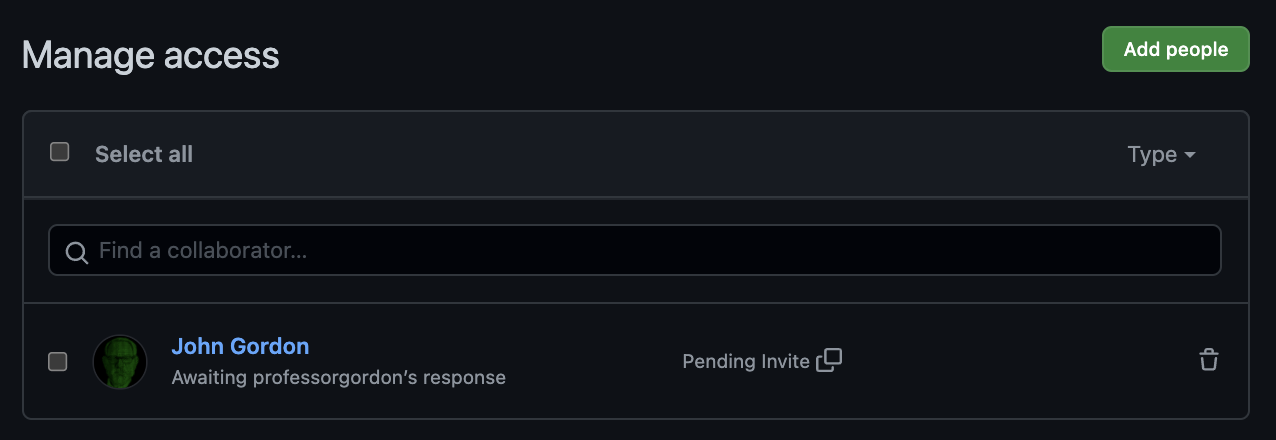
- Once the user accepts the invitation their name will no longer display the pending status.
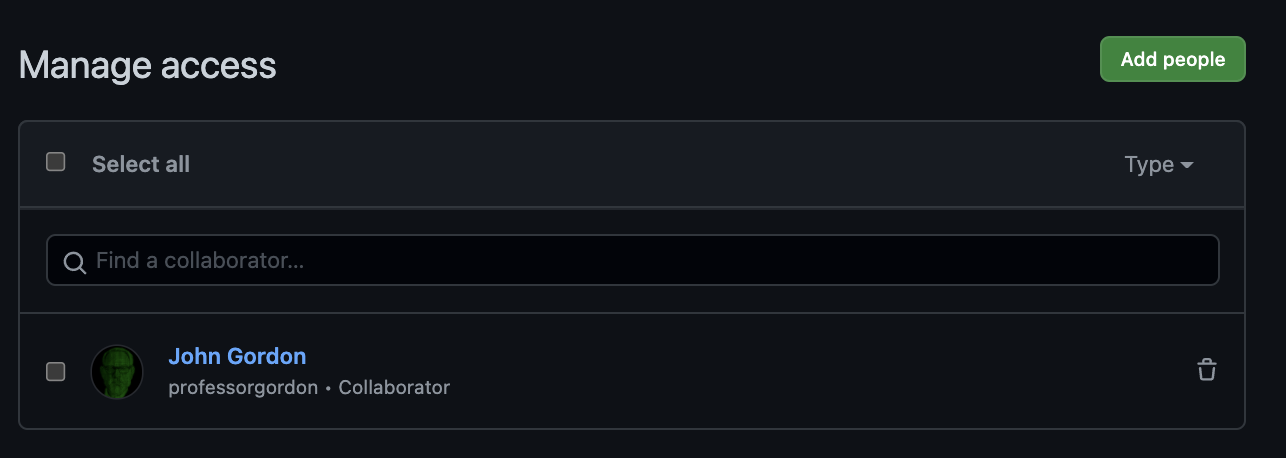
From that point on that user can access the repository, push and pull to and from the repository, etc.
To delete a repository follow these steps:
- In the GitHub web interface navigate to the repository that you want to invite a collaborator to and click the Settings button.
- On the Settings page scroll all the way to the very bottom of the page to the Danger Zone
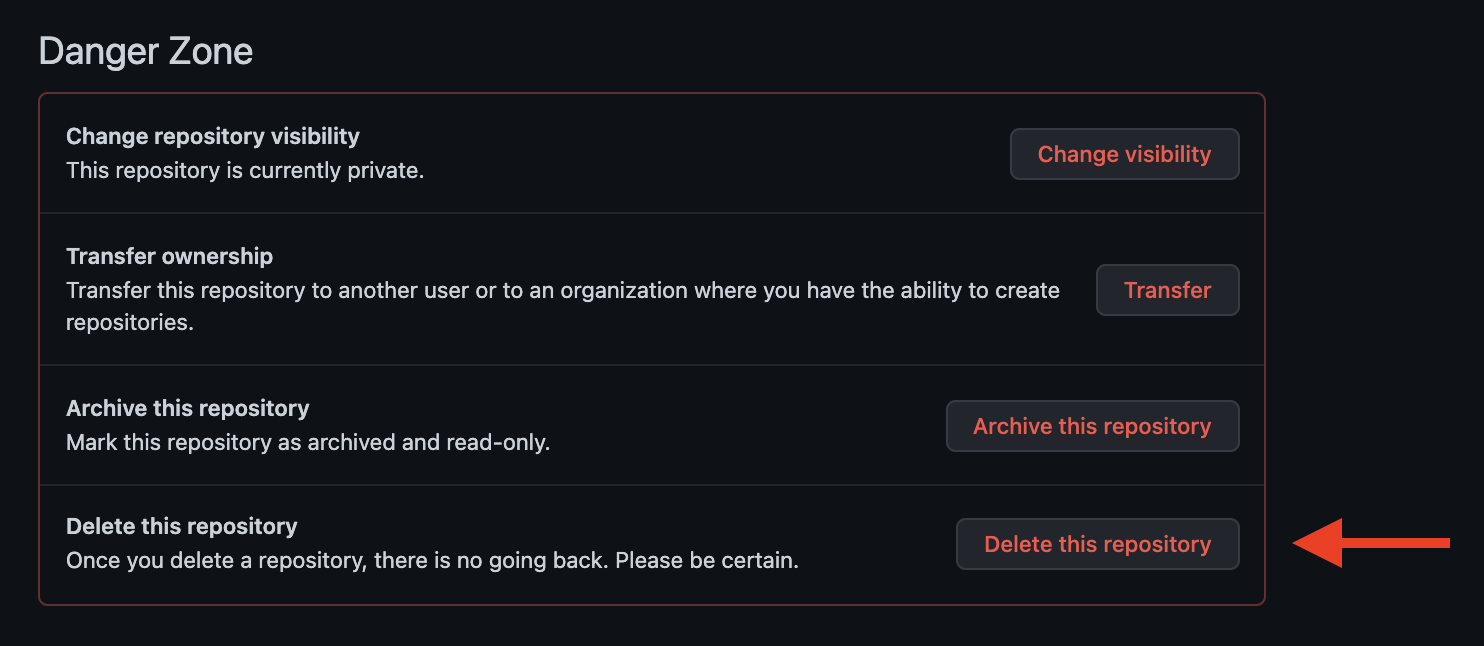
- Click the Delete this repository button.
- A prompt will appear confirming you want to delete the repository.
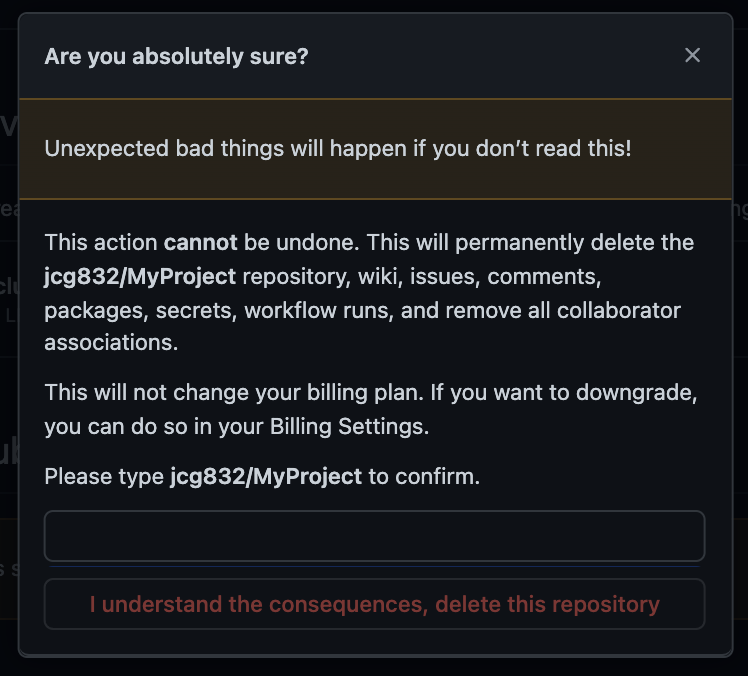
- Enter the characters displayed on the dialog:
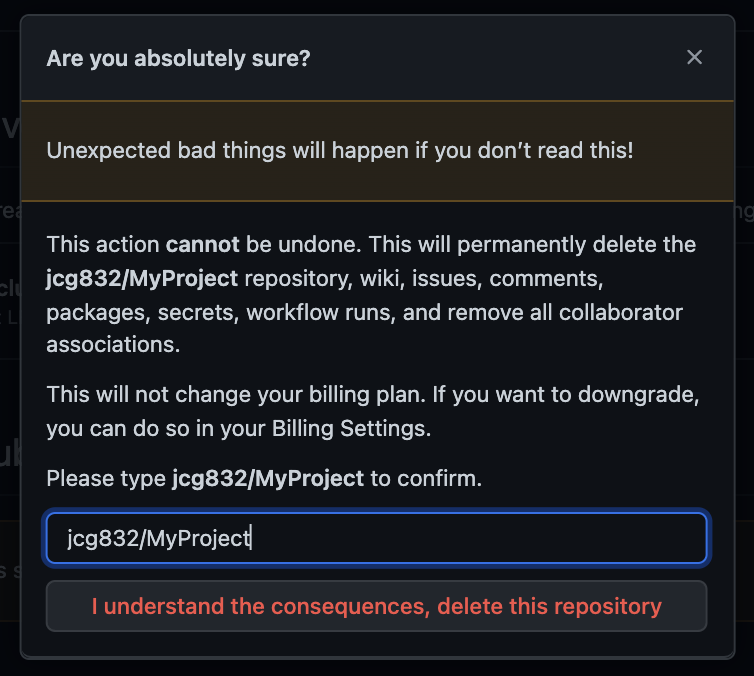
- And click the I understand the consequences, delete this repository button.
- The repository will be deleted.
GitHub uses Personal Access Tokens (PATs) in place of passwords for authentication with GitHub from external applications, such as IDEs, editors, etc. In order to use a PAT you must first create it through the GitHub web interface. The following instructions outline how to create a PAT for your GitHub account.
- First, log into your GitHub account in the web interface.
- Next, click your profile photo (top right of any GitHub page).
- Select Settings on the profile menu.
- On the Settings screen select the Developer Settings left-side menu option.
- Then select Personal Access Tokens left-side menu option.
- Click the Generate a personal access token.
- You may be prompted for your GitHub password.
- The New personal access token appears:
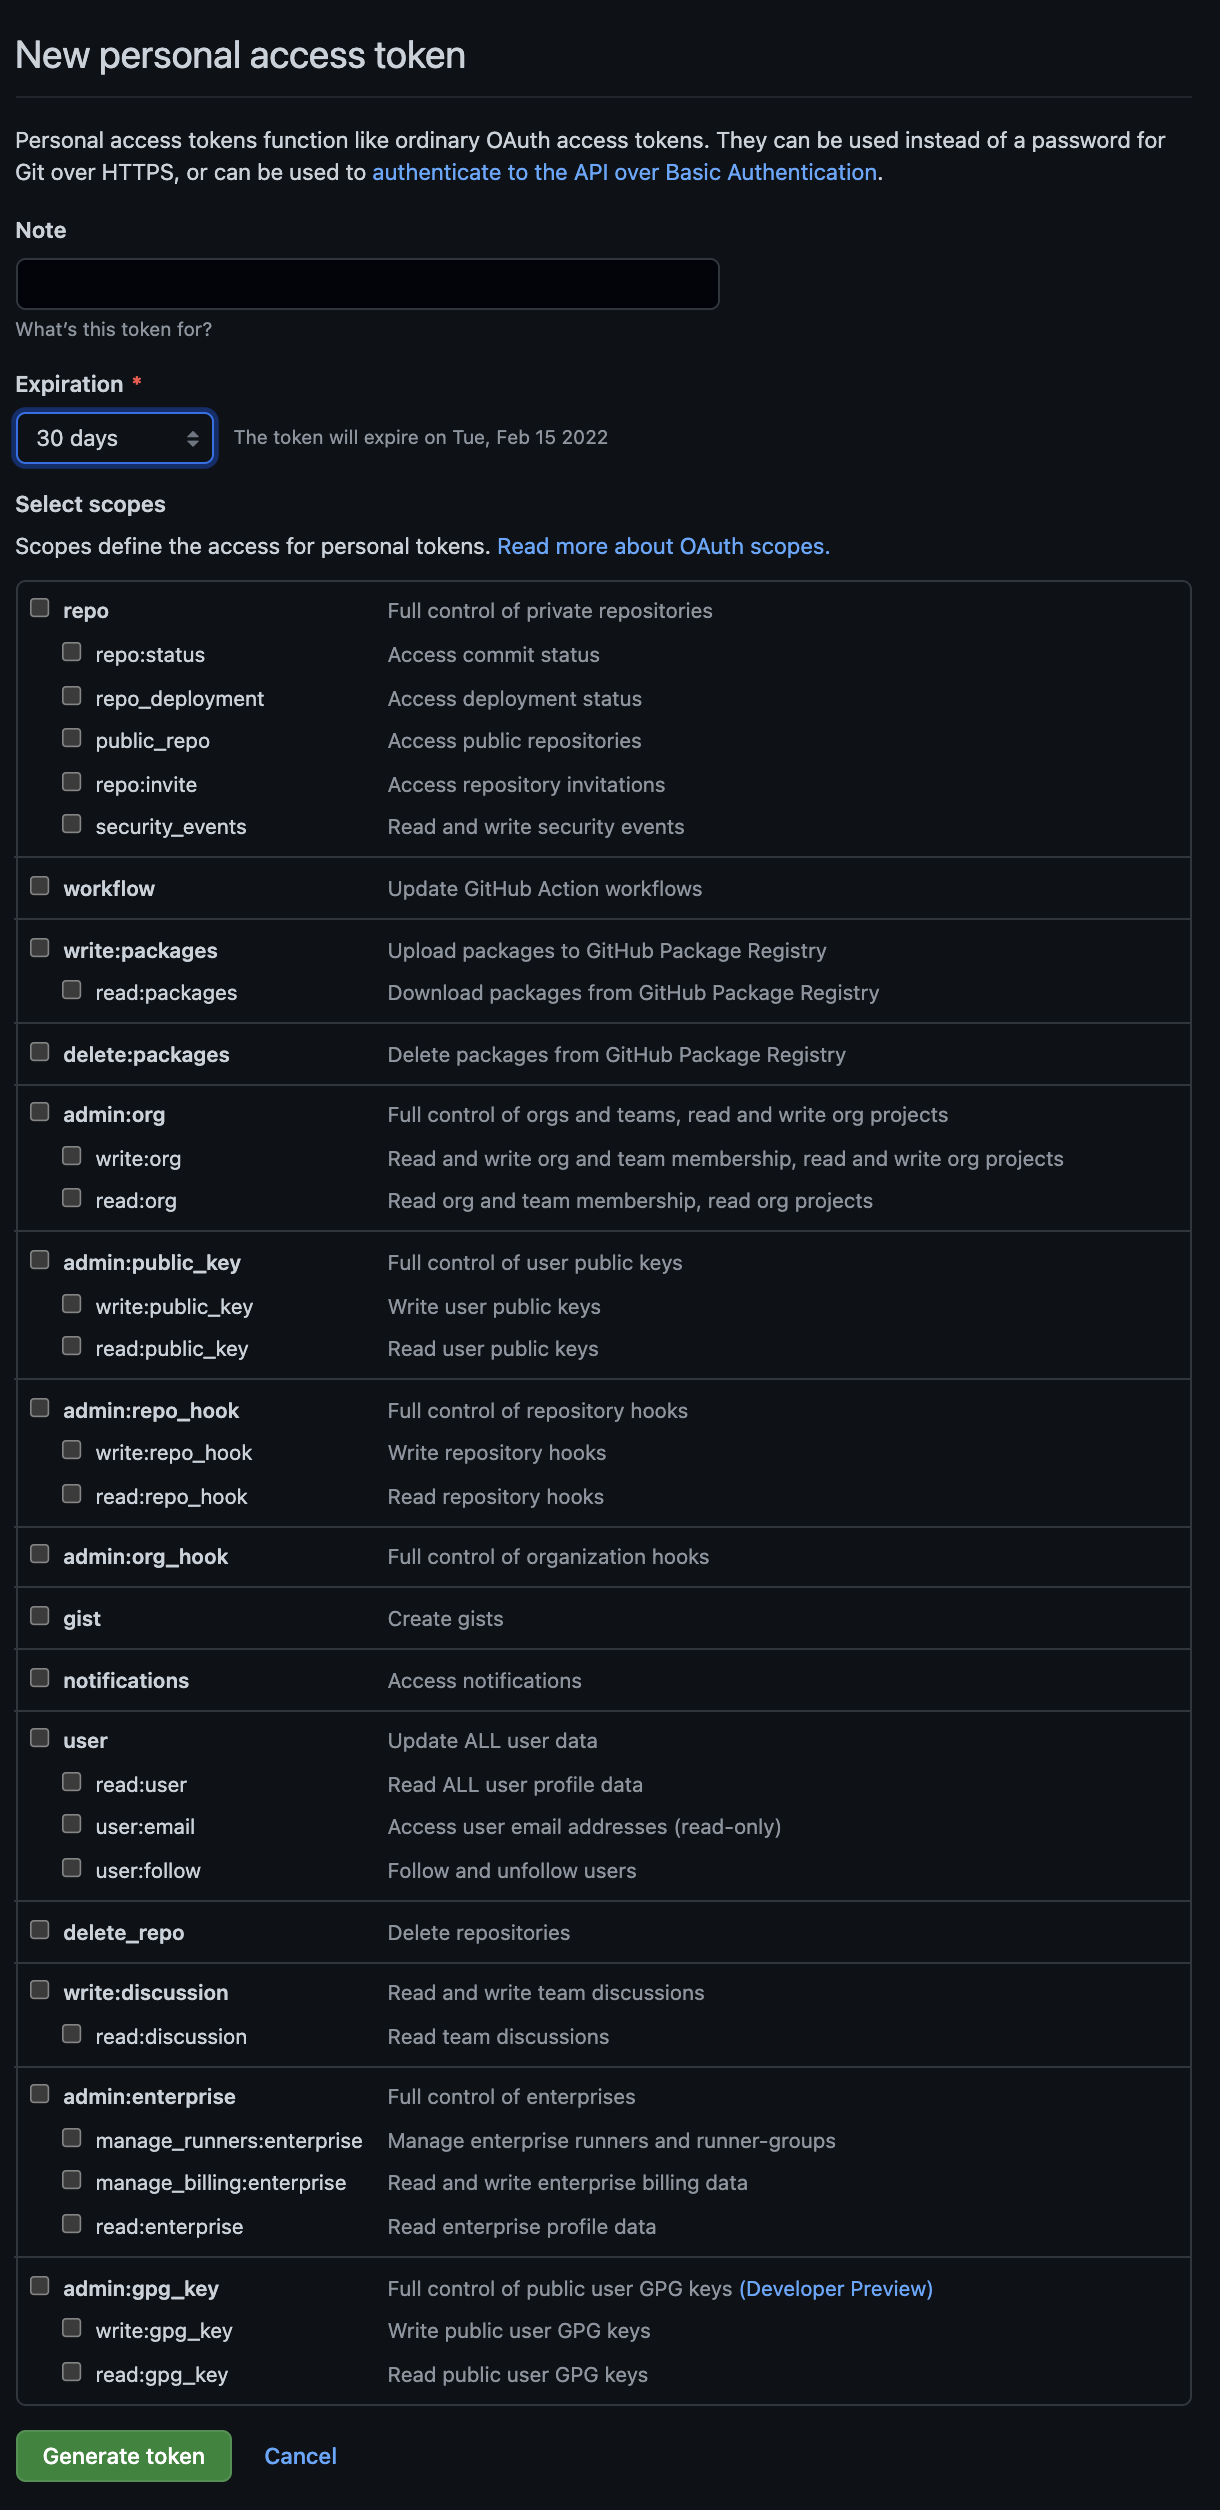
- You can enter a Note to indicate the purpose of this PAT.
- Next, decide on the expiration time frame by selectig from the Expiration drop-down.
- Then choose the Scopes, which are the types of access to your GitHub account you want this PAT to allow.
- When you click the Generate PAT button the token is displayed, which is the random string of characters along the bottom:
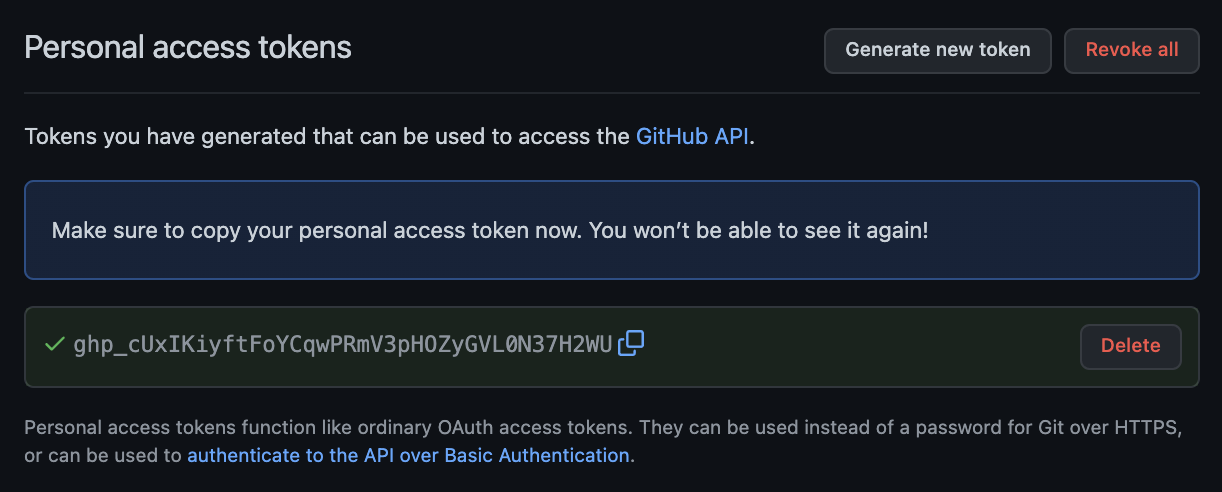
- Copy the token for use in your IDE, editor or other tool that needs to make remote connections to your GitHub account over HTTPS.
Note: You can find full GitHub documentation on PATs on GitHub's site here.