Home » Chapter 7 : Libraries
Standard Library
The Python Standard Library is a collection of modules and packages that come bundled with every installation of Python. These modules and packages contain a wide range of functions and tools that can be used to perform various tasks, from reading and writing files to generating random numbers.
The Standard Library is divided into several categories, each containing modules and packages related to a specific area of functionality. Here are some examples of categories and the modules/packages they contain:
There are many circumstances in programming that require working with dates and times. Working with data types like integers, floats, and strings is straight forward as we saw on the previous pages in this book. Dates and times are a bit different because they are not simply numbers or strings, they embody more complicated concepts like different date formats, for example:
# import the datetime module
# Note the use of an alias with "as"
import datetime as dt

# Print the current date
print(dt.date.today())
# Print the current date and time
print(dt.datetime.now())

# Capture the Current date and time in a variable
now = dt.datetime.now()
print(f"Current date and time: {now}")

# Get the Current date
current_date = now.date()
print(f"Current date: {current_date}")

# Get the current time
current_time = now.time()
print(f"Current time: {current_time}")

# Capture and print parts of the date
year = now.year
month = now.month
day = now.day
print(f"Year: {year}")
print(f"Month: {month}")
print(f"Day: {day}")

# Create a date (YYYY, MM, DD)
specific_date = dt.date(2025, 1, 1)
print(f"Specific date: {specific_date}")

# Create a time (HH, MM, SS)
specific_time = dt.time(15, 30, 45)  # 3:30:45 PM
print(f"Specific time: {specific_time}")

# Get a delta (time difference)
delta = dt.timedelta(days=10)  # A difference of 10 days
print(delta)

# Add 10 days to current date
new_date = current_date + delta
print(f"Date after 10 days: {new_date}")

# Subtract 10 days from current date
previous_date = current_date - delta
print(f"Date 10 days ago: {previous_date}")2023-11-05
2023-11-05 15:50:59.241292
Current date and time: 2023-11-05 15:50:59.241948
Current date: 2023-11-05
Current time: 15:50:59.241948
Year: 2023
Month: 11
Day: 5
Specific date: 2025-01-01
Specific time: 15:30:45
10 days, 0:00:00
Date after 10 days: 2023-11-15
Date 10 days ago: 2023-10-26# import the datetime module
# Note the use of an alias with "as"
import datetime as dt
# Get the current date and time
now = dt.datetime.now()
print(now)
print(now.strftime("%a")) # Weekday, short
print(now.strftime("%A")) # Weekday, full
print(now.strftime("%w")) # Weekday, number
print(now.strftime("%d")) # Day of month
print(now.strftime("%b")) # Month name, short
print(now.strftime("%B")) # Month name, full
print(now.strftime("%m")) # Month number
print(now.strftime("%y")) # Year, short
print(now.strftime("%Y")) # Year, full
print(now.strftime("%p")) # AM or PM
print(now.strftime("%c")) # Local date, full
print(now.strftime("%x")) # Local date, short2023-11-05 16:16:41.428216
Sun
Sunday
0
05
Nov
November
11
23
2023
PM
Sun Nov 5 16:16:41 2023
11/05/23The Standard Library Math Module provides numerous mathematical functions. You can find a full list of the available functions in the module here. Let's take a look at a few of them (see the comments in the code examples below for explanations). Pay particular attention to the syntax of the import statement and how we call the functions.
import math

# math.pow(x, y) raises x to the power of y.
print(math.pow(2, 4))

# math.sqrt(x) returns the square root of x.
print(math.sqrt(144))

# math.pi is a constant (a value that never
# changes). This is an example of using a
# a constant in the module as part of a
# calculation in our program - the area
# of a circle.
circle_radius = 20
print(math.pi * circle_radius**2)

# math.factorial(x) returns the factorial
# value of x. Factorial is annotated as x!
# and is calculated by multiplying all whole
# numbers from x down to 1, like this:
# 5! = 5 * 4 * 3 * 2 * 1 = 120
print(math.factorial(10))16.0
12.0
1256.6370614359173
3628800
The Standard Library Platform Module provides access to the platform (operating system) that your program is running on. This information can be very important since Python is cross-platform but different platforms have differences (for example, the way file paths work) so we can use the Platform Module to detect what platform our program is running on and adjust accordingly. You can find a full list of the available functions in the module here. Let's take a look at some of them:
import platform

print("\nOperating System:\t" + platform.system())
print("OS Release:\t\t\t" + platform.release())
print("OS Version:\t\t\t" + platform.version())
print("Machine Type:\t\t" + platform.machine())
print("Node Name:\t\t\t" + platform.node())
print("UName Tuple:\t\t" + str(platform.uname()))
print("Platform:\t\t\t" + platform.platform())
print("Processor:\t\t\t" + platform.processor())
print("Python Build:\t\t" + str(platform.python_build()))
print("Python Compiler:\t" + platform.python_compiler())
print("Python Version:\t\t" + platform.python_version())Operating System: Windows
OS Release: 10
OS Version: 10.0.19041
Machine Type: AMD64
Node Name: Gandalf
UName Tuple: uname_result(system='Windows', node='Gandalf', release='10',
version='10.0.19041', machine='AMD64')
Platform: Windows-10-10.0.19041-SP0
Processor: Intel64 Family 6 Model 142 Stepping 12, GenuineIntel
Python Build: ('tags/v3.9.4:1f2e308', 'Apr 6 2021 13:40:21')
Python Compiler: MSC v.1928 64 bit (AMD64)
Python Version: 3.9.4Operating System: Linux
OS Release: 5.4.0-47-generic
OS Version: #51~18.04.1-Ubuntu SMP Sat Sep 5 14:35:50 UTC 2020
Machine Type: x86_64
Node Name: gimli
UName Tuple: uname_result(system='Linux', node='gimli',
release='5.4.0-47-generic', version='#51~18.04.1-Ubuntu
SMP Sat Sep 5 14:35:50 UTC 2020', machine='x86_64')
Platform: Linux-5.4.0-47-generic-x86_64-with-glibc2.27
Processor: x86_64
Python Build: ('default', 'Apr 9 2021 01:10:48')
Python Compiler: GCC 7.5.0
Python Version: 3.9.4
Operating System: Darwin
OS Release:       20.3.0
OS Version:       Darwin Kernel Version 20.3.0: Thu Jan 21 00:07:06
  PST 2021; root:xnu-7195.81.3~1/RELEASE_X86_64
Machine Type:     x86_64
Node Name:        Frodo.local
UName Tuple:      uname_result(system='Darwin', node='Frodo.local',
  release='20.3.0', version='Darwin Kernel Version 20.3.0:
  Thu Jan 21 0:07:06 PST 2021;
  root:xnu-7195.81.3~1/RELEASE_X86_64', machine='x86_64')
Platform:         macOS-10.16-x86_64-i386-64bit
Processor:        i386
Python Build:     ('v3.9.4:1f2e3088f3', 'Apr  4 2021 12:32:44')
Python Compiler:  Clang 6.0 (clang-600.0.57)
Python Version:   3.9.4
import platform

if platform.platform().startswith("Windows"):
    # Run Windows-specific code here ...
    print("Windows OS")
elif platform.platform().startswith("Linux"):
    # Run Linux-specific code here ...
    print("Linux OS")
elif platform.platform().startswith("macOS"):
    # Run Mac-specific code here ...
    print("MAC OS")
else:
    # Do something else because this is not
    # running on a Windows, Linux, or Mac computer.
    print("Don't know what OS this is!")
The Standard Library Random Module provides pseudo-random number generation. You can find a full list of the available functions in the module here. Let's take a look at a couple of examples of using the random module (see the comments in the code examples below for explanations).
import random

# random.randomint(x, y) returns a random integer between
# the values of x and y. Mathematically this would be
# stated as x <= r <= y, where r is a random integer.
# Notice that since this generates random numbers between
# 1 and 6, we could use this as a dice roll simulation.
print(random.randint(1, 6))
print()

# Let's use randomint(x, y) again, this time we'll call it
# numerous times to see the random nature more clearly.
min_num = 1
max_num = 6
for i in range(10):
    print(random.randint(min_num, max_num))
print()

# random.randrange(start, stop[,step]) returns a random
# integer between the values of start and stop. Optionally
# we can add a step value to that limits the possible
# return values to only the values specified by step,
# within the start stop range. Here are a few examples:
print(random.randrange(5, 20))  # returns a random integer
# in this range: 5 <= r <= 20.
print()
print(random.randrange(0, 100, 10))     # returns a random
# integer in the range 0 <= r <= 100, but the possible
# values between 1 and 100 is limited by the step value of
# 10, so we will only get back one of these values in the
# range: 0, 10, 20, 30, 40, 50, 60, 70, 80, 90, 100.4
2
5
5
3
2
3
3
3
6
6
8
70
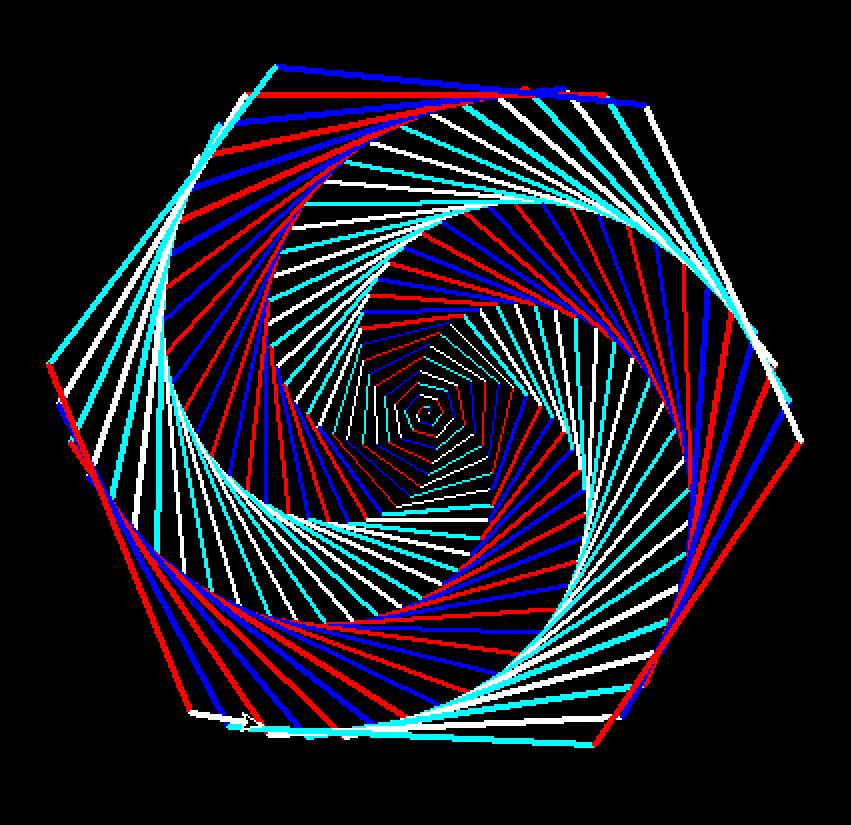
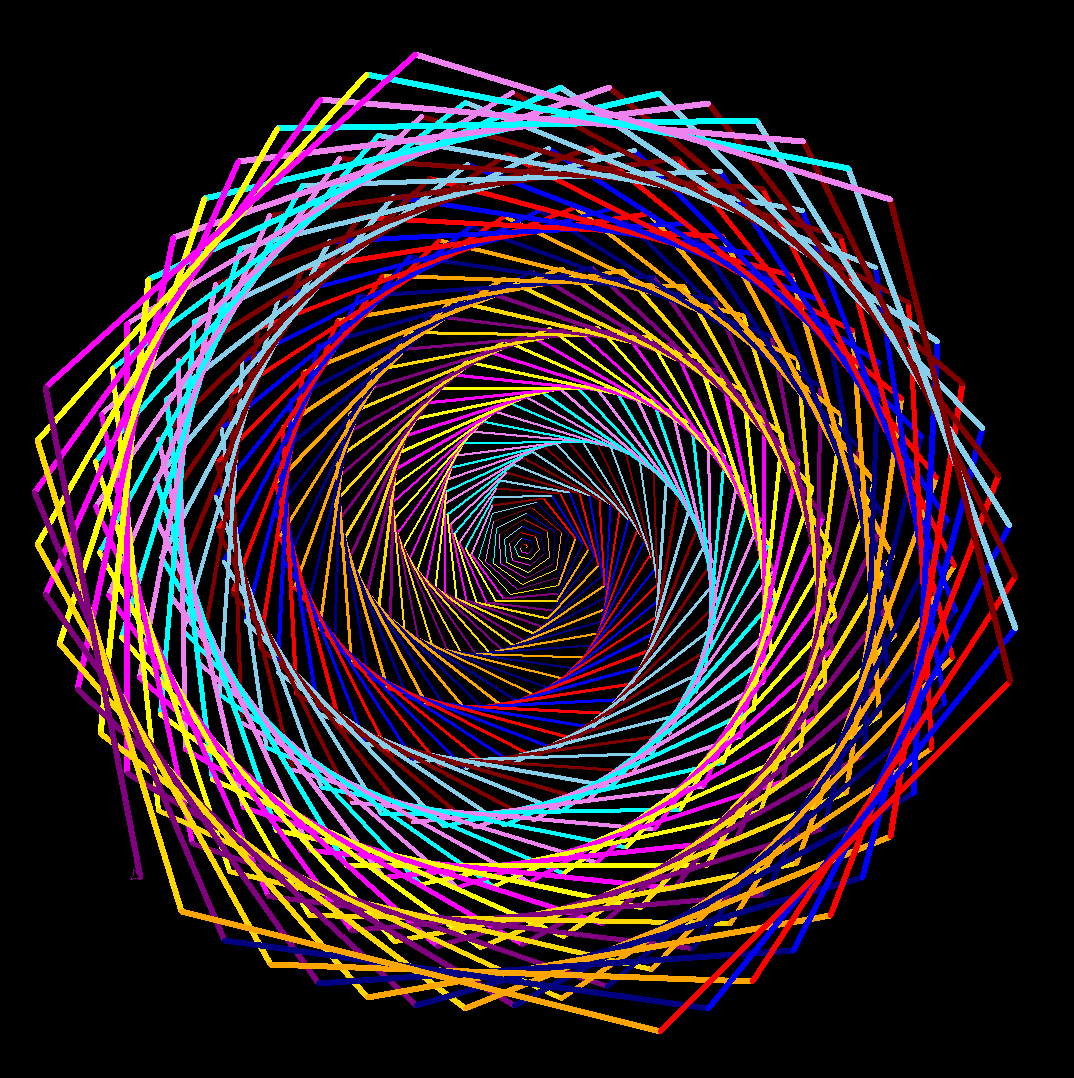
The Standard Library Turtle Module provides simple graphics capabilities. You can find a full list of the available functions in the module here. Let's take a look at a few of them (see the comments in the code examples below for explanations). Pay particular attention to the syntax of the import statement and how we call the functions.
import turtle

# Turtle graphics allow us to draw lines and
# shapes in various colors. This example uses
# a loop to draw lines and adjust each new
# line's position slightly so that the result
# is a concentric shape.
# We use a list to set some colors. The Turtle
# Module can recognize many colors by name, so
# we use names to select the colors we want
# for our lines.
color_list = ["yellow", "gold", "orange", "red",
        "maroon", "violet", "magenta", "purple",
        "navy", "blue", "skyblue", "cyan",
        "turquoise", "lightgreen", "green",
        "darkgreen", "chocolate", "brown",
        "white"]
# With the turtle module imported, we can
# use its methods to control different aspects
# of how it will appear on the screen, for
# example, we can use .bgcolor() to set its
# background color.
turtle.bgcolor("black")
# The Pen() method of the Turtle module allows
# us to control various attributes of the "pen"
# for our drawing, including its position,
# color, direction, etc.
pen = turtle.Pen()
# Now we use a loop to draw the lines:
for i in range(500):
    # Each time the loop iterates we select
    # one of the colors from the list based
    # on the loop index, the modulus operator
    # and the number of colors in our list.
    pen.pencolor(color_list[i % 12])
    # We also adjust the width of our pen
    # each iteration as well
    pen.width(i / 100 + 1)
    # The pen draws a length equal to our
    # loop index value (i)
    pen.forward(i)
    # And then we shift the position of
    # the pen so the next iteration will
    # begin drawing at a regular interval
    # each time the loop repeats.
    pen.left(59)
# This input statement is here to keep the
# program from closing our drawing.
input("Press enter in the console to end.")